Open End Bend (Less Than 90°)
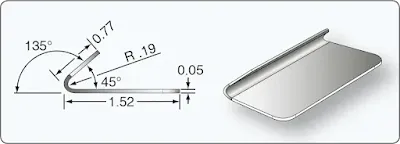
Figure 1 shows an example for a 45° bend. |
| Figure 1. Open bend |
1. Look up K-factor in K chart. K-factor for 45° is 0.41421-inch.
2. Calculate setback.
SB = K(R + T)
SB = 0.41421-inch(0.1875-inch + 0.050-inch) = 0.098-inch
3. Calculate bend allowance for 45°. Look up bend allowance for 1° of bend in the bend allowance chart and multiply this by 45.
0.003675-inch × 45 = 0.165-inch
4. Calculate flats.
Flat = Mold line dimension – SB
Flat 1 = .77-inch – 0.098-inch = 0.672-inch
Flat 2 = 1.52-inch – 0.098-inch = 1.422-inch
5. Calculate TDW
TDW = Flats + Bend allowance
TDW = 0.672-inch + 1.422-inch + 0.165-inch = 2.259‑inch
Observe that the brake reference line is still located one radius from the bend tangent line.
2. Calculate SB.
SB = K(R + T)
SB = 2.4142-inch(0.1875-inch + 0.050-inch) = 0.57-inch
3. Calculate bend allowance for 135°. Look up bend allowance for 1° of bend in the bend allowance chart and multiply this by 135.
0.003675-inch × 135 = 0.496-inch
4. Calculate flats.
Flat = Mold line dimension – SB
Flat 1 = 0.77-inch – 0.57-inch = 0.20-inch
Flat 2 = 1.52-inch – 0.57-inch = 0.95-inch
5. Calculate TDW.
TDW = Flats + Bend allowance
TDW = 0.20-inch + 0.95-inch + 0.496-inch = 1.65-inch
It is obvious from both examples that a closed bend has a smaller TDW than an open-end bend and the material length needs to be adjusted accordingly.
RELATED POSTS
2. Calculate setback.
SB = K(R + T)
SB = 0.41421-inch(0.1875-inch + 0.050-inch) = 0.098-inch
3. Calculate bend allowance for 45°. Look up bend allowance for 1° of bend in the bend allowance chart and multiply this by 45.
0.003675-inch × 45 = 0.165-inch
4. Calculate flats.
Flat = Mold line dimension – SB
Flat 1 = .77-inch – 0.098-inch = 0.672-inch
Flat 2 = 1.52-inch – 0.098-inch = 1.422-inch
5. Calculate TDW
TDW = Flats + Bend allowance
TDW = 0.672-inch + 1.422-inch + 0.165-inch = 2.259‑inch
Observe that the brake reference line is still located one radius from the bend tangent line.
Closed End Bend (More Than 90°)
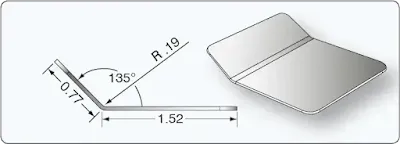
Figure 2 shows an example of a 135° bend. |
| Figure 2. Closed bend |
1. Look up K-factor in K chart. K-factor for 135° is 2.4142-inch.
2. Calculate SB.
SB = K(R + T)
SB = 2.4142-inch(0.1875-inch + 0.050-inch) = 0.57-inch
3. Calculate bend allowance for 135°. Look up bend allowance for 1° of bend in the bend allowance chart and multiply this by 135.
0.003675-inch × 135 = 0.496-inch
4. Calculate flats.
Flat = Mold line dimension – SB
Flat 1 = 0.77-inch – 0.57-inch = 0.20-inch
Flat 2 = 1.52-inch – 0.57-inch = 0.95-inch
5. Calculate TDW.
TDW = Flats + Bend allowance
TDW = 0.20-inch + 0.95-inch + 0.496-inch = 1.65-inch
It is obvious from both examples that a closed bend has a smaller TDW than an open-end bend and the material length needs to be adjusted accordingly.
RELATED POSTS