For example, if a formed or extruded angle is to be curved, either stretch one leg or shrink the other, whichever makes the part fit. In bumping, the material is stretched in the bulge to make it balloon, and in joggling, the material is stretched between the joggles. Material in the edge of lightening holes is often stretched to form a beveled reinforcing ridge around them. The following paragraphs discuss some of these techniques.
Straight Line Bends
The cornice brake and bar folder are ordinarily used to make straight bends. Whenever such machines are not available, comparatively short sections can be bent by hand with the aid of wooden or metal bending blocks.After a blank has been laid out and cut to size, clamp it along the bend line between two wooden forming blocks held in a vise. The wooden forming blocks should have one edge rounded as needed for the desired radius of bend. It should also be curved slightly beyond 90° to allow for spring-back.
Bend the metal that protrudes beyond the bending block to the desired angle by tapping lightly with a rubber, plastic, or rawhide mallet. Start tapping at one end and work back and forth along the edge to make a gradual and even bend. Continue this process until the protruding metal is bent to the desired angle against the forming block. Allow for springback by driving the material slightly farther than the actual bend. If a large amount of metal extends beyond the forming blocks, maintain hand pressure against the protruding sheet to prevent it from bouncing. Remove any irregularities by holding a straight block of hardwood edgewise against the bend and striking it with heavy blows of a mallet or hammer. If the amount of metal protruding beyond the bending blocks is small, make the entire bend by using the hardwood block and hammer.
Formed or Extruded Angles
Both formed and extruded types of angles can be curved (not bent sharply) by stretching or shrinking either of the flanges. Curving by stretching one flange is usually preferred since the process requires only a V-block and a mallet and is easily accomplished.Stretching With V-Block Method
In the stretching method, place the flange to be stretched in the groove of the V-block. [Figure 1] (If the flange is to be shrunk, place the flange across the V-block.) Using a round, soft-faced mallet, strike the flange directly over the V portion with light, even blows while gradually forcing it downward into the V. |
| Figure 1. V-block forming |
Lay out a full-sized, accurate pattern on a sheet of paper or plywood and periodically check the accuracy of the curve. Comparing the angle with the pattern determines exactly how the curve is progressing and just where it needs to be increased or decreased. It is better to get the curve to conform roughly to the desired shape before attempting to finish any one portion, because the finishing or smoothing of the angle may cause some other portion of the angle to change shape. If any part of the angle strip is curved too much, reduce the curve by reversing the angle strip on the V-block, placing the bottom flange up, and striking it with light blows of the mallet.
Try to form the curve with a minimum amount of hammering, for excessive hammering work-hardens the metal. Workhardening can be recognized by a lack of bending response or by springiness in the metal. It can be recognized very readily by an experienced worker. In some cases, the part may have to be annealed during the curving operation. If so, be sure to heat treat the part again before installing it on the aircraft.
Shrinking With V-Block and Shrinking Block Methods
Curving an extruded or formed angle strip by shrinking may be accomplished by either the previously discussed V-block method or the shrinking block method. While the V-block is more satisfactory because it is faster, easier, and affects the metal less, good results can be obtained by the shrinking block method.In the V-block method, place one flange of the angle strip flat on the V-block with the other flange extending upward. Using the process outlined in the stretching paragraphs, begin at one end of the angle strip and work back and forth making light blows. Strike the edge of the flange at a slight angle to keep the vertical flange from bending outward.
Occasionally, check the curve for accuracy with the pattern. If a sharp curve is made, the angle (cross section of the formed angle) closes slightly. To avoid such closing of the angle, clamp the angle strip to a hardwood board with the hammered flange facing upward using small C-clamps. The jaws of the C-clamps should be covered with masking tape. If the angle has already closed, bring the flange back to the correct angle with a few blows of a mallet or with the aid of a small hardwood block. If any portion of the angle strip is curved too much, reduce it by reversing the angle on the V-block and hammering with a suitable mallet, as explained in the previous paragraph on stretching. After obtaining the proper curve, smooth the entire angle by planishing with a soft-faced mallet.
If the curve in a formed angle is to be quite sharp or if the flanges of the angle are rather broad, the shrinking block method is generally used. In this process, crimp the flange that is to form the inside of the curve.
When making a crimp, hold the crimping pliers so that the jaws are about 1⁄8-inch apart. By rotating the wrist back and forth, bring the upper jaw of the pliers into contact with the flange, first on one side and then on the other side of the lower jaw. Complete the crimp by working a raised portion into the flange, gradually increasing the twisting motion of the pliers. Do not make the crimp too large because it will be difficult to work out. The size of the crimp depends upon the thickness and softness of the material, but usually about 1⁄4-inch is sufficient. Place several crimps spaced evenly along the desired curve with enough space left between each crimp so that jaws of the shrinking block can easily be attached.
After completing the crimping, place the crimped flange in the shrinking block so that one crimp at a time is located between the jaws. [Figure 2] Flatten each crimp with light blows of a soft-faced mallet, starting at the apex (the closed end) of the crimp and gradually working toward the edge of the flange. Check the curve of the angle with the pattern periodically during the forming process and again after all the crimps have been worked out. If it is necessary to increase the curve, add more crimps and repeat the process. Space the additional crimps between the original ones so that the metal does not become unduly work hardened at any one point. If the curve needs to be increased or decreased slightly at any point, use the V-block.
 |
| Figure 2. Crimping a metal flange in order to form a curve |
Flanged Angles
The forming process for the following two flanged angles is slightly more complicated than the previously discussed angles because the bend is shorter (not gradually curved) and necessitates shrinking or stretching in a small or concentrated area. If the flange is to point toward the inside of the bend, the material must be shrunk. If it is to point toward the outside, it must be stretched.Shrinking
In forming a flanged angle by shrinking, use wooden forming blocks similar to those shown in Figure 3 and proceed as follows: |
| Figure 3. Forming a flanged angle using forming blocks |
- Cut the metal to size, allowing for trimming after forming. Determine the bend allowance for a 90° bend and round the edge of the forming block accordingly.
- Clamp the material in the form blocks as shown in Figure 3, and bend the exposed flange against the block. After bending, tap the blocks slightly. This induces a setting process in the bend.
- Using a soft-faced shrinking mallet, start hammering near the center and work the flange down gradually toward both ends. The flange tends to buckle at the bend because the material is made to occupy less space. Work the material into several small buckles instead of one large one and work each buckle out gradually by hammering lightly and gradually compressing the material in each buckle. The use of a small hardwood wedge block aids in working out the buckles. [Figure 4]
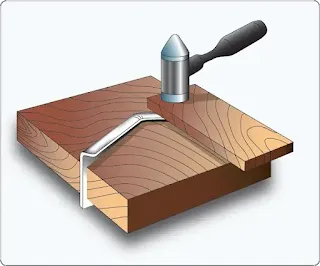 |
| Figure 4. Shrinking |
- Planish the flange after it is flattened against the form block and remove small irregularities. If the form blocks are made of hardwood, use a metal planishing hammer. If the forms are made of metal, use a softfaced mallet. Trim the excess material away and file and polish.
Stretching
To form a flanged angle by stretching, use the same forming blocks, wooden wedge block, and mallet as used in the shrinking process and proceed as follows:- Cut the material to size (allowing for trim), determine bend allowance for a 90° bend, and round off the edge of the block to conform to the desired radius of bend.
- Clamp the material in the form blocks. [Figure 5]
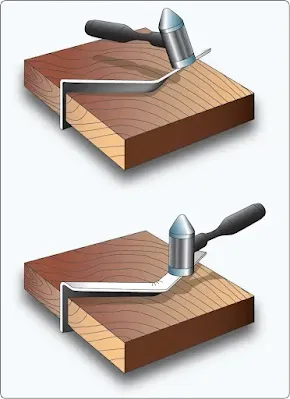 |
| Figure 5. Stretching a flanged angle |
- Using a soft-faced stretching mallet, start hammering near the ends and work the flange down smoothly and gradually to prevent cracking and splitting. Planish the flange and angle as described in the previous procedure, and trim and smooth the edges, if necessary.
Curved Flanged Parts
Curved flanged parts are usually hand formed with a concave flange, the inside edge, and a convex flange, the outside edge.The concave flange is formed by stretching, while the convex flange is formed by shrinking. Such parts are shaped with the aid of hardwood or metal forming blocks. [Figure 6] These blocks are made in pairs and are designed specifically for the shape of the area being formed. These blocks are made in pairs similar to those used for straight angle bends and are identified in the same manner. They differ in that they are made specifically for the particular part to be formed, they fit each other exactly, and they conform to the actual dimensions and contour of the finished article.
 |
| Figure 6. Forming blocks |
The nose rib offers a good example of forming a curved flange because it incorporates both stretching and shrinking (by crimping). They usually have a concave flange, the inside edge, and a convex flange, the outside edge. Note the various types of forming represented in the following figures. In the plain nose rib, only one large convex flange is used. [Figure 7] Because of the great distance around the part and the likelihood of buckles in forming, it is rather difficult to form. The flange and the beaded (raised ridge on sheet metal used to stiffen the piece) portion of this rib provide sufficient strength to make this a good type to use.
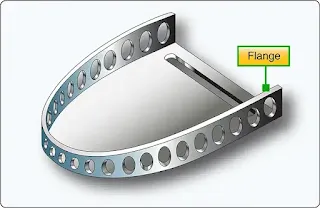 |
| Figure 7. Plain nose rib |
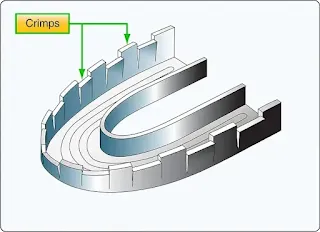
In Figure 8, the concave flange is difficult to form, but the outside flange is broken up into smaller sections by relief holes. In Figure 9, note that crimps are placed at equally spaced intervals to absorb material and cause curving, while also giving strength to the part.
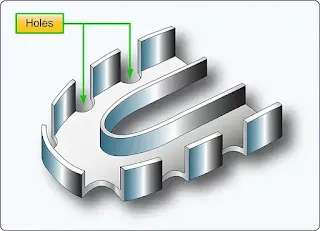 |
| Figure 8. Nose rib with relief holes |
 |
| Figure 9. Nose rib with crimps |
 |
| Figure 10. Nose rib using a combination of forms |
 |
| Figure 11. Forming a concave flange |
 |
| Figure 12. Forming a convex flange |
- Cut the material to size, allowing about 1⁄4-inch excess material for trim and drill holes for alignment pins.
- Remove all burrs (jagged edges). This reduces the possibility of the material cracking at the edges during the forming process.
- Locate and drill holes for alignment pins.
- Place the material between the form blocks and clamp blocks tightly in a vise to prevent the material from moving or shifting. Clamp the work as closely as possible to the particular area being hammered to prevent strain on the form blocks and to keep the metal from slipping.
Concave Surfaces
Bend the flange on the concave curve first. This practice may keep the flange from splitting open or cracking when the metal is stretched. Should this occur, a new piece must be made. Using a plastic or rawhide mallet with a smooth, slightly rounded face, start hammering at the extreme ends of the part and continue toward the center of the bend. This procedure permits some of the metal at the ends of the part to be worked into the center of the curve where it is needed. Continue hammering until the metal is gradually worked down over the entire flange, flush with the form block. After the flange is formed, trim off the excess material and check the part for accuracy. [Figure 11]Convex Surfaces
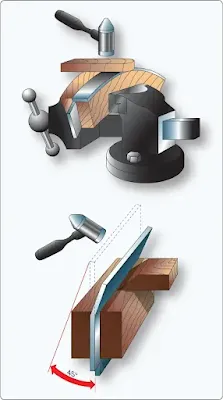
Convex surfaces are formed by shrinking the material over a form block. [Figure 12] Using a wooden or plastic shrinking mallet and a backup or wedge block, start at the center of the curve and work toward both ends. Hammer the flange down over the form, striking the metal with glancing blows at an angle of approximately 45° and with a motion that tends to pull the part away from the radius of the form block. Stretch the metal around the radius bend and remove the buckles gradually by hammering on a wedge block. Use the backup block to keep the edge of the flange as nearly perpendicular to the form block as possible. The backup block also lessens the possibility of buckles, splits, or cracks. Finally, trim the flanges of excess metal, planish, remove burrs, round the corners (if any), and check the part for accuracy.Forming by Bumping
As discussed earlier, bumping involves stretching the sheet metal by bumping it into a form and making it balloon. [Figure 13] Bumping can be done on a form block or female die, or on a sandbag.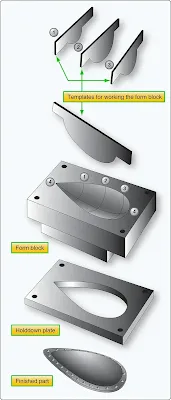 |
| Figure 13. Form block bumping |
Form Block or Die
The wooden block or lead die designed for form block bumping must have the same dimensions and contour as the outside of the blister. To provide enough bucking weight and bearing surface for fastening the metal, the block or die should be at least one inch larger in all dimensions than the form requires.Follow these procedures to create a form block:
- Hollow the block out with tools, such as saws, chisels, gouges, files, and rasps.
- Smooth and finish the block with sandpaper. The inside of the form must be as smooth as possible, because the slightest irregularity shows up on the finished part.
- Prepare several templates (patterns of the crosssection), as shown in Figure 13 so that the form can be checked for accuracy.
- Shape the contour of the form at points 1, 2, and 3.
- Shape the areas between the template checkpoints to conform the remaining contour to template 4. Shaping of the form block requires particular care because the more nearly accurate it is, the less time it takes to produce a smooth, finished part.
After the form is prepared and checked, perform the bumping as follows:
- Cut a metal blank to size allowing an extra 1⁄2 to 1-inch to permit drawing.
- Apply a thin coat of light oil to the block and the aluminum to prevent galling (scraping on rough spots).
- Clamp the material between the block and steel plate. Ensure it is firmly supported yet it can slip a little toward the inside of the form.
- Clamp the bumping block in a bench vise. Use a softfaced rubber mallet, or a hardwood drive block with a suitable mallet, to start the bumping near the edges of the form.
- Work the material down gradually from the edges with light blows of the mallet. Remember, the purpose of bumping is to work the material into shape by stretching rather than forcing it into the form with heavy blows. Always start bumping near the edge of the form. Never start near the center of the blister.
- Before removing the work from the form, smooth it as much as possible by rubbing it with the rounded end of either a maple block or a stretching mallet.
- Remove the blister from the bumping block and trim to size.
Sandbag Bumping
Sandbag bumping is one of the most difficult methods of hand forming sheet metal because there is no exact forming block to guide the operation. [Figure 14] In this method, a depression is made into the sandbag to take the shape of the hammered portion of the metal. The depression or pit has a tendency to shift from the hammering, which necessitates periodic readjustment during the bumping process. The degree of shifting depends largely on the contour or shape of the piece being formed, and whether glancing blows must be struck to stretch, draw, or shrink the metal. When forming by this method, prepare a contour template or some sort of a pattern to serve as a working guide and to ensure accuracy of the finished part. Make the pattern from ordinary kraft or similar paper, folding it over the part to be duplicated. Cut the paper cover at the points where it would have to be stretched to fit, and attach additional pieces of paper with masking tape to cover the exposed portions. After completely covering the part, trim the pattern to exact size. |
| Figure 14. Sandbag bumping |
If the part to be formed is radially symmetrical, it is fairly easy to shape since a simple contour template can be used as a working guide. The procedure for bumping sheet metal parts on a sandbag follows certain basic steps that can be applied to any part, regardless of its contour or shape.
- Lay out and cut the contour template to serve as a working guide and to ensure accuracy of the finished part. (This can be made of sheet metal, medium to heavy cardboard, kraft paper, or thin plywood.)
- Determine the amount of metal needed, lay it out, and cut it to size, allowing at least 1⁄2-inch in excess.
- Place a sandbag on a solid foundation capable of supporting heavy blows and make a pit in the bag with a smooth-faced mallet. Analyze the part to determine the correct radius the pit should have for the forming operation. The pit changes shape with the hammering it receives and must be readjusted accordingly.
- Select a soft round-faced or bell-shaped mallet with a contour slightly smaller than the contour desired on the sheet metal part. Hold one edge of the metal in the left hand and place the portion to be bumped near the edge of the pit on the sandbag. Strike the metal with light glancing blows.
- Continue bumping toward the center, revolving the metal, and working gradually inward until the desired shape is obtained. Shape the entire part as a unit.
- Check the part often for accuracy of shape during the bumping process by applying the template. If wrinkles form, work them out before they become too large.
- Remove small dents and hammer marks with a suitable stake and planishing hammer or with a hand dolly and planishing hammer.
- Finally, after bumping is completed, use a pair of dividers to mark around the outside of the object. Trim the edge and file it smooth. Clean and polish the part.
Joggling
A joggle, often found at the intersection of stringers and formers, is the offset formed on a part to allow clearance for a sheet or another mating part. Use of the joggle maintains the smooth surface of a joint or splice. The amount of offset is usually small; therefore, the depth of the joggle is generally specified in thousandths of an inch. The thickness of the material to be cleared governs the depth of the joggle. In determining the necessary length of the joggle, allow an extra 1⁄16-inch to give enough added clearance to assure a fit between the joggled, overlapped part. The distance between the two bends of a joggle is called the allowance. This dimension is normally called out on the drawing. However, a general rule of thumb for figuring allowance is four times the thickness of the displacement of flat sheets. For 90° angles, it must be slightly more due to the stress built up at the radius while joggling. For extrusions, the allowance can be as much as 12 times the material thickness, so, it is important to follow the drawing.There are a number of different methods of forming joggles. For example, if the joggle is to be made on a straight flange or flat piece of metal, it can be formed on a cornice break. To form the joggle, use the following procedure:
- Lay out the boundary lines of the joggle where the bends are to occur on the sheet.
- Insert the sheet in the brake and bend the metal up approximately 20° to 30°.
- Release the brake and remove the part.
- Turn the part over and clamp it in the brake at the second bend line.
- Bend the part up until the correct height of the joggle is attained.
- Remove the part from the brake and check the joggle for correct dimensions and clearance.
When a joggle is necessary on a curved part or a curved flange, forming blocks or dies made of hardwood, steel, or aluminum alloy may be used. The forming procedure consists of placing the part to be joggled between the two joggle blocks and squeezing them in a vice or some other suitable clamping device. After the joggle is formed, the joggle blocks are turned over in the vice and the bulge on the opposite flange is flattened with a wooden or rawhide mallet. [Figure 15]
 |
| Figure 15. Forming joggle using joggle blocks |
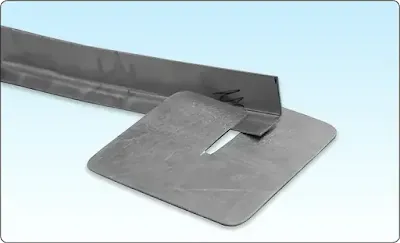
When using joggling dies for the first time, test them for accuracy on a piece of waste stock to avoid the possibility of ruining already fabricated parts. Always keep the surfaces of the blocks free from dirt, filings, and the like, so that the work is not marred. [Figure 16]
 |
| Figure 16. Samples of joggled metal |
Lightening Holes
Lightening holes are cut in rib sections, fuselage frames, and other structural parts to decrease weight. To avoid weakening the member by removal of the material, flanges are often pressed around the holes to strengthen the area from which the material was removed.Lightening holes should never be cut in any structural part unless authorized. The size of the lightening hole and the width of the flange formed around the hole are determined by design specifications. Margins of safety are considered in the specifications so that the weight of the part can be decreased and still retain the necessary strength. Lightening holes may be cut with a hole saw, a punch, or a fly cutter. The edges are filed smooth to prevent them from cracking or tearing.
Flanging Lightening Holes
Form the flange by using a flanging die, or hardwood or metal form blocks. Flanging dies consist of two matching parts: a female and a male die. For flanging soft metal, dies can be of hardwood, such as maple. For hard metal or for more permanent use, they should be made of steel. The pilot guide should be the same size as the hole to be flanged, and the shoulder should be the same width and angle as the desired flange.When flanging lightening holes, place the material between the mating parts of the die and form it by hammering or squeezing the dies together in a vise or in an arbor press (a small hand operated press). The dies work more smoothly if they are coated with light machine oil. [Figure 17]
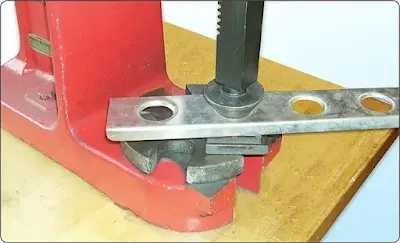 |
| Figure 17. Lightening hole die set |
- Forming Process and Forming Operations and Terms
- Layout and Forming
- Making Straight Line Bends
- Using a Sheet Metal Brake to Fold Metal
- Folding a Box
- Open and Closed Bends
- Basic Principles of Sheet Metal Repair
- Repairability of Sheet Metal Structure