The larger and smoother the relief hole is, the less likely it will be that a crack will form in the corner. Generally, the radius of the relief hole is specified on the drawing. A box and pan brake, also called a finger brake, is used to bend the box. Two opposite sides of the box are bent first. Then, the fingers of the brake are adjusted so the folded-up sides ride up in the cracks between the fingers when the leaf is raised to bend the other two sides.
The size of relief holes varies with thickness of the material. They should be no less than 1⁄8-inch in diameter for aluminum alloy sheet stock up to and including 0.064-inch thick, or 3⁄160-inch in diameter for stock ranging from 0.072-inch to 0.128-inch thickness. The most common method of determining the diameter of a relief hole is to use the radius of bend for this dimension, provided it is not less than the minimum allowance (1⁄8-inch).
Relief Hole Location
Relief holes must touch the intersection of the inside bend tangent lines. To allow for possible error in bending, make the relief holes extend 1⁄32-inch to 1⁄16-inch behind the inside bend tangent lines. It is good practice to use the intersection of these lines as the center for the holes. The line on the inside of the curve is cut at an angle toward the relief holes to allow for the stretching of the inside flange.
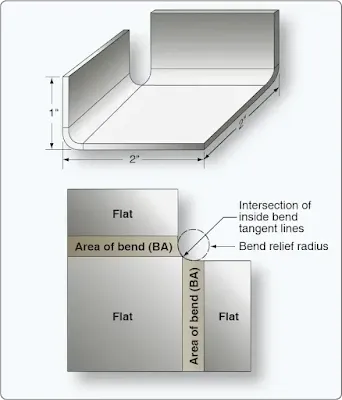
The positioning of the relief hole is important. [Figure 1] It should be located so its outer perimeter touches the intersection of the inside bend tangent lines. This keeps any material from interfering with the bend allowance area of the other bend. If these bend allowance areas intersected with each other, there would be substantial compressive stresses that would accumulate in that corner while bending. This could cause the part to crack while bending.
The positioning of the relief hole is important. [Figure 1] It should be located so its outer perimeter touches the intersection of the inside bend tangent lines. This keeps any material from interfering with the bend allowance area of the other bend. If these bend allowance areas intersected with each other, there would be substantial compressive stresses that would accumulate in that corner while bending. This could cause the part to crack while bending.
 |
| Figure 1. Relief hole location |
Layout Method
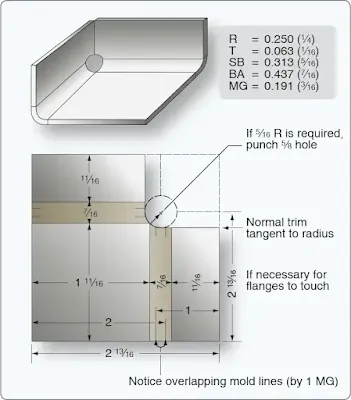
Lay out the basic part using traditional layout procedures. This determines the width of the flats and the bend allowance. It is the intersection of the inside bend tangent lines that index the bend relief hole position. Bisect these intersected lines and move outward the distance of the radius of the hole on this line. This is the center of the hole. Drill at this point and finish by trimming off the remainder of the corner material. The trim out is often tangent to the radius and perpendicular to the edge. [Figure 2] |
| Figure 2. Relief hole layout |
This leaves an open corner. If the corner must be closed, or a slightly longer flange is necessary, then trim out accordingly. If the corner is to be welded, it is necessary to have touching flanges at the corners. The length of the flange should be one material thickness shorter than the finished length of the part so only the insides of the flanges touch.
RELATED POSTS
RELATED POSTS