The strength of a wooden aircraft repair depends largely on the quality of the glue joint. Proper surface preparation, correct adhesive selection, and careful control of temperature, pressure, and assembly time are essential to produce a bond that is as strong as the original wood.
Satisfactory glue joints in aircraft should develop the full strength of the wood under all conditions of stress. To produce this result, the conditions involved in the gluing operation must be carefully controlled to obtain a continuous, thin, uniform film of solid glue in the joint with adequate adhesion to both surfaces of the wood. These conditions are required:
- Proper and equal moisture content of wood to be joined (8 to 12 percent).
- Properly prepared wood surfaces that are machined or planed, and not sanded or sawed.
- Selection of the proper adhesive for the intended task, which is properly prepared and of good quality.
- The application of good gluing techniques, including fitment, recommended assembly times, and adequate equal pressure applied to the joint.
- Performing the gluing operation under the recommended temperature conditions.
The surfaces to be joined must be clean, dry, and free from grease, oil, wax, paint, etc. Keep large prepared surfaces covered with a plastic sheet or masking paper prior to the bonding operation. It is advisable to clean all surfaces with a vacuum cleaner just prior to adhesive application.
Smooth even surfaces produced on planers and joiners with sharp knives and correct feed adjustments are the best surfaces for gluing solid wood. The use of sawn surfaces for gluing has been discouraged for aircraft component assembly because of the difficulty in producing a surface free of crushed fibers. Glue joints made on surfaces that are covered with crushed fibers do not develop the normal full strength of the wood.
Some of the surface changes in plywood, such as glazing and bleed-through, that occur in manufacture and may interfere with the adhesion of glue in secondary gluing are easily recognized. A light sanding of the surface with 220-grit sandpaper in the direction of the grain restores the surface fibers to their original condition, removes the gloss, and improves the adhesion of the glue. In contrast to these recognized surface conditions, wax deposits from cauls used during hot pressing produce unfavorable gluing surfaces that are not easily detected.
Wetting tests are a useful means of detecting the presence of wax. A finely sprayed mist or drops of water on the surface of wax-coated plywood bead and do not wet the wood. This test may also give an indication of the presence of other materials or conditions that would degrade a glue joint. Only a proper evaluation of the adhesion properties, using gluing tests, determines the gluing characteristics of the plywood surfaces.
Preparing Glues for Use
The manufacturer’s directions should be followed for the preparation of any glue or adhesive. Unless otherwise specified by the glue manufacturer, clear, cool water should be used with glues that require mixing with water. The recommended proportions of glue, catalyst, and water or other solvent should be determined by the weight of each component. Mixing can be either by hand or machine. Whatever method is used, the glue should be thoroughly mixed and free of air bubbles, foam, and lumps of insoluble material.
Applying the Glue/Adhesive
To make a satisfactorily bonded joint, it is generally desirable to apply adhesive to both surfaces and join in a thin even layer. The adhesive can be applied with a brush, glue spreader, or a grooved rubber roller. Follow the adhesive manufacturer’s application instructions for satisfactory results.
Be careful to ensure the surfaces make good contact and the joint is positioned correctly before applying the adhesive. Keep the open assembly time as short as possible and do not exceed the recommended times indicated in the product data sheet.
Pressure on the Joint
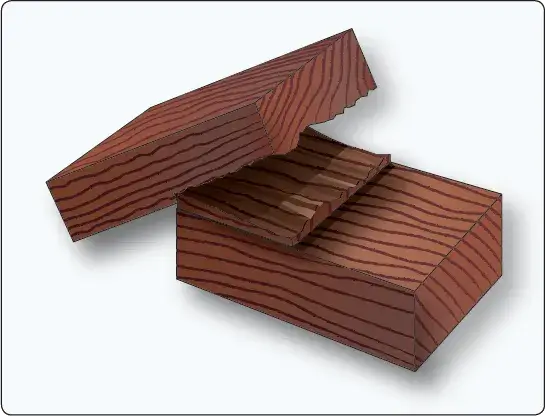
To ensure the maximum strength of the bonded surfaces, apply even force to the joint. Non-uniform gluing pressure commonly results in weak areas and strong areas in the same joint. The results of applied pressure are illustrated in Figure 1.
 |
| Figure 1. Even distribution of gluing pressure creates a strong, gap-free joint |
Use pressure to squeeze the glue out into a thin continuous film between the wood layers, to force air from the joint, to bring the wood surfaces into intimate contact with the glue, and to hold them in this position during the setting of the glue. Pressure may be applied by means of clamps, elastic straps, weight, vacuum bags, or other mechanical devices. Other methods used to apply pressure to joints in aircraft gluing operations range from the use of brads, nails, and screws to the use of electric and hydraulic power presses.
The amount of pressure required to produce strong joints in aircraft assembly operations may vary from 10 to 150 psi for softwoods and as high as 200 psi for hardwoods. Insufficient pressure to poorly machined or fitted wood joints usually results in a thick glue line, indicating a weak joint, and should be carefully avoided.
High clamping pressure is neither essential nor desirable, provided good contact between the surfaces being joined is obtained. When pressure is applied, a small quantity of glue should be squeezed from the joint. This excess should be removed before it sets. It is important that full pressure be maintained on the joint for the entire cure time of the adhesive because the adhesive does not chemically relink and bond if it is disturbed before it is fully cured.
The full curing time of the adhesive is dependent on the ambient temperature; therefore, it is very important to follow the manufacturer’s product data sheets for all phases of the gluing operation from the shelf life to the moisture content of the wood to the proper mixing of the adhesive to the application, and especially to the temperature. The successful assembly and fabrication depend on the workmanship and quality of the joints and following the glue manufacturer’s instructions.
All gluing operations should be performed above 70 °F for proper performance of the adhesive. Higher temperatures shorten the assembly times, as does coating the pieces of wood with glue and exposing openly to the air. This open assembly promotes a more rapid thickening of the glue than pieces being mated together as soon as the spreading of the glue is completed.
Figure 2 provides an example of resorcinol resin glue and the allowable assembly times and gluing pressure when in the open and closed assembly condition. All examples are for an ambient temperature of 75 °F.
 |
| Figure 2. Examples of differences for open and closed assembly times |
Figure 3 provides examples of strong and weak glue joints resulting from different gluing conditions. A is a well-glued joint with a high percentage of wood failure made under proper conditions; B is a glue-starved joint resulting from the application of excessive pressure with thin glues; C is a dried glue joint resulting from an excessively long assembly time and/or insufficient pressure.
 |
| Figure 3. Strong and weak glue joints |
Testing Glued Joints
Satisfactory glue joints in aircraft should develop the full strength of the wood under all conditions of stress. Tests should be made by the mechanic prior to gluing a joint of a major repair, such as a wing spar. Whenever possible, perform tests using pieces cut from the actual wood used for the repair under the same mechanical and environmental conditions that the repair will undergo.
Perform a sample test using two pieces of scrap wood from the intended repair, each cut approximately 1" × 2" × 4". The pieces should be joined by overlapping each approximately 2 inches. The type of glue, pressure, and curing time should be the same as used for the actual repair. After full cure, place the test sample in a bench vise and break the joint by exerting pressure on the overlapping member. The fractured glue faces should show a high percentage of at least 75 percent of the wood fibers evenly distributed over the fractured glue surface. [Figure 4]
 |
| Figure 4. An example of good glue joint |
Should aircraft wood surfaces be sanded before gluing?
What is the ideal moisture content for aircraft wood joints?
How much pressure is required for a strong glue joint?
How do you verify the strength of a finished glue joint?
RELATED POSTS