Composite repairs involve specialized procedures used to restore damaged composite aircraft structures. Repair methods include wet layups, prepreg systems, bonding techniques, vacuum bagging, and controlled curing processes. Proper material handling, ply orientation, resin control, and curing are critical to achieving a structurally sound repair.
Types of Layups
Wet Layups
During the wet layup process, a dry fabric is impregnated with a resin. Mix the resin system just before making the repair. Lay out the repair plies on a piece of fabric and impregnate the fabric with the resin. After the fabric is impregnated, cut the repair plies, stack in the correct ply orientation, and vacuum bag. Wet layup repairs are often used with fiberglass for nonstructural applications. Carbon and Kevlar® dry fabric could also be used with a wet layup resin system.
Many resin systems used with wet layup cure at room temperature, are easy to use, and the materials can be stored at room temperature for long periods of time. The disadvantage of room temperature wet layup is that it does not restore the strength and durability of the original structure and parts that were cured at 250 °F or 350 °F during manufacturing. Some wet layup resins use an elevated temperature cure and have improved properties. In general, wet layup properties are less than properties of prepreg material.
Epoxy resins may require refrigeration until they are used. This prevents the aging of the epoxy. The label on the container states the correct storage temperature for each component. The typical storage temperature is between 40 °F and 80 °F for most epoxy resins. Some resin systems require storage below 40 °F.
Prepreg
Prepreg is a fabric or tape that is impregnated with a resin during the manufacturing process. The resin system is already mixed and is in the B stage cure. Store the prepreg material in a freezer below 0 °F to prevent further curing of the resin. The material is typically placed on a roll and a backing material is placed on one side of the material so that the prepreg does not stick together. The prepreg material is sticky and adheres to other plies easily during the stack-up process.
You must remove the prepreg from the freezer and let the material thaw, which might take 8 hours for a full roll. Store the prepreg materials in a sealed, moisture-proof bag. Do not open these bags until the material is completely thawed, to prevent contamination of the material by moisture.
After the material is thawed and removed from the backing material, cut it into repair plies, stack in the correct ply orientation, and vacuum bag. Do not forget to remove the backing material when stacking the plies. Cure prepregs at an elevated cure cycle; the most common temperatures used are 250 °F and 350 °F. Autoclaves, curing ovens, and heat bonders can be used to cure the prepreg material.
Consolidation is necessary if parts are made from several layers of prepreg, because large quantities of air can be trapped between each prepreg layer. Remove this trapped air by covering the prepreg with a perforated release film and a breather ply, and apply a vacuum bag. Apply the vacuum for 10 to 15 minutes at room temperature. Typically, attach the first consolidated ply to the tool face and repeat this process after every 3 or 5 layers depending on the prepreg thickness and component shape.
Store prepreg, film adhesive, and foaming adhesives in a freezer at a temperature below 0 °F. If these types of materials need to be shipped, place them in special containers filled with dry ice. The freezer must not be of the automatic defrost type; the auto-defrost cycle periodically warms the inside of the freezer, which can reduce the shelf life and consume the allowable out-time of the composite material.
Freezers must be capable of maintaining 0 °F or below; most household freezers meet this level. Walk-in freezers can be used for large volume cold storage. If usage is small, a chest-type freezer may suffice. Refrigerators are used to store laminating and paste adhesives and should be kept near 40 °F. [Figure 1]
 |
| Figure 1. Walk-in freezer for storing prepreg materials |
Uncured prepreg materials have time limits for storage and use. [Figure 2]
 |
| Figure 2. Storage life for prepreg materials |
The maximum time allowed for storing of a prepreg at low temperature is called the storage life, which is typically 6 months to a year. The material can be tested, and the storage life could be extended by the material manufacturer. The maximum time allowed for material at room temperature before the material cures is called the mechanical life.
The recommended time at room temperature to complete layup and compaction is called the handling life. The handling life is shorter than the mechanical life. The mechanical life is measured from the time the material is removed from the freezer until the time the material is returned to the freezer. The operator must keep records of the time in and out of the freezer. Material that exceeds the mechanical life needs to be discarded.
Many repair facilities cut the material in smaller kits and store them in moisture-proof bags that thaw quicker when removed from the freezer. This also limits the time out of the freezer for a big roll.
All frozen prepreg materials need to be stored in a moisture-proof bag to avoid moisture contamination. All prepreg material should be protected from dust, oil, vapors, smoke, and other contaminants. A clean room for repair layup would be best, but if a clean room is not available, the prepreg should be protected by storing them in bags or keeping them covered with plastic. Before starting the layup, cover the unprotected sides of the prepreg with parting film, and clean the area being repaired immediately before laying up the repair plies.
Prepreg material is temperature sensitive. Excessively high temperatures cause the material to begin curing, and excessively low temperatures make the material difficult to handle. For repairs on aircraft in very cold or very hot climates, the area should be protected by a tent around the repair area. Prepare the prepreg repair plies in a controlled-temperature environment and bring them to the repair area immediately before using them.
Co-curing
Co-curing is a process wherein two parts are simultaneously cured. The interface between the two parts may or may not have an adhesive layer. Co-curing often results in poor panel surface quality, which is prevented by using a secondary surfacing material co-cured in the standard cure cycle or a subsequent fill-and-fair operation. Co-cured skins may also have poorer mechanical properties, requiring the use of reduced design values.
A typical co-cure application is the simultaneous cure of a stiffener and a skin. Adhesive film is frequently placed into the interface between the stiffener and the skin to increase fatigue and peel resistance. Principal advantages derived from the co-cure process are excellent fit between bonded components and guaranteed surface cleanliness.
Secondary Bonding
Secondary bonding utilizes precured composite detail parts, and uses a layer of adhesive to bond two precured composite parts. Honeycomb sandwich assemblies commonly use a secondary bonding process to ensure optimal structural performance. Laminates co-cured over honeycomb core may have distorted plies that have dipped into the core cells. As a result, compressive stiffness and strength can be reduced as much as 10 and 20 percent, respectively.
Precured laminates undergoing secondary bonding usually have a thin nylon or fiberglass peel ply cured onto the bonding surfaces. While the peel ply sometimes hampers nondestructive inspection of the precured laminate, it has been found to be the most effective means of ensuring surface cleanliness prior to bonding. When the peel ply is stripped away, a pristine surface becomes available. Light scuff sanding removes high resin peak impressions produced by the peel ply weave which, if they fracture, create cracks in the bondline.
Composite materials can be used to structurally repair, restore, or enhance aluminum, steel, and titanium components. Bonded composite doublers have the ability to slow or stop fatigue crack growth, replace lost structural area due to corrosion grind-outs, and structurally enhance areas with small and negative margins. This technology has often been referred to as a combination of metal bonding and conventional on-aircraft composite bonded repair. Boron prepreg tape with an epoxy resin is most often used for this application.
Co-bonding
In the co-bonding process, one of the detail parts is precured with the mating part being cured simultaneously with the adhesive. Film adhesive is often used to improve peel strength.
Layup Process (Typical Laminated Wet Layup)
Layup Techniques
Read the SRM and determine the correct repair material, number of plies required for the repair, and the ply orientation. Dry the part, remove the damage, and taper sand the edges of the damaged area. Use a piece of thin plastic, and trace the size of each repair ply from the damaged area. Indicate the ply orientation of each ply on the trace sheet. Copy the repair ply information to a piece of repair material that is large enough to cut all plies. Impregnate the repair material with resin, place a piece of transparent release film over the fabric, cut out the plies, and lay up the plies in the damaged area.
The plies are usually placed using the smallest ply first taper layup sequence, but an alternative method is to use the largest ply first layup sequence. In this sequence, the first layer of reinforcing fabric completely covers the work area, followed by successively smaller layers, and then is finished with an extra outer layer or two extending over the patch and onto the sound laminate for some distance. Both methods are illustrated in Figures 3 and 4.
 |
| Figure 3. Repair layup process |
 |
| Figure 4. Different layup techniques |
Bleedout Technique
The traditional bleedout using a vacuum bag technique places a perforated release film and a breather/bleeder ply on top of the repair. The holes in the release film allow air to breathe and resin to bleed off over the entire repair area. The amount of resin bled off depends on the size and number of holes in the perforated release film, the thickness of the bleeder/breather cloth, the resin viscosity and temperature, and the vacuum pressure.
Controlled bleed allows a limited amount of resin to bleed out in a bleeder ply. Place a piece of perforated release film on top of the prepreg material, a bleeder ply on top of the perforated release film, and a solid release film on top of the bleeder.
Use a breather and a vacuum bag to compact the repair. The breather allows the air to escape. The bleeder can only absorb a limited amount of resin, and the amount of resin that is bled can be controlled by using multiple bleeder plies. Too many bleeder plies can result in a resin-starved repair. Always consult the maintenance manual or manufacturer tech sheets for correct bagging and bleeding techniques.
No Bleedout
Prepreg systems with 32 to 35 percent resin content are typically no-bleed systems. These prepregs contain exactly the amount of resin needed in the cured laminate; therefore, resin bleedoff is not desired. Bleedout of these prepregs results in a resin-starved repair or part. Many high-strength prepregs in use today are no-bleed systems. No bleeder is used, and the resin is trapped/sealed so that none bleeds away.
Consult the maintenance manual to determine if bleeder plies are required for the repair. A sheet of solid release film (no holes) is placed on top of the prepreg and taped off at the edges with flash tape. Small openings are created at the edges of the tape so that air can escape. A breather and vacuum bag are installed to compact the prepreg plies. The air can escape on the edge of the repair but no resin can bleed out. [Figure 5]
 |
| Figure 5. Vacuum bagging of contoured part |
Horizontal (or edge) bleedout is used for small room temperature wet layup repairs. A 2-inch strip of breather cloth is placed around the repair or part (edge breather). There is no need for a release film because there is no bleeder/breather cloth on top of the repair. The part is impregnated with resin, and the vacuum bag is placed over the repair. A vacuum is applied and a squeegee is used to remove air and excess resin to the edge breather.
Ply Orientation Warp Clock
In order to minimize any residual thermal stresses caused during cure of the resin, it is always good practice to design a symmetrical, or balanced, laminate. Examples of balanced laminates are presented in Figure 6.
 |
| Figure 6. Examples of balance laminates |
The first example uses unidirectional tape, and examples 2 and 3 are typical quasi-isotropic laminates fabricated from woven cloth.
Figure 7 presents examples of the effects caused by nonsymmetrical laminates.
 |
| Figure 7. Examples of the effects caused by nonsymmetrical laminates |
These effects are most pronounced in laminates that are cured at high temperature in an autoclave or oven due to the thermal stresses developed in the laminate as the laminate cools down from the cure temperature to room temperature. Laminates cured at room temperature using typical wet layup do not exhibit the same degree of distortion due to the much smaller thermal stresses. The strength and stiffness of a composite buildup depends on the ply orientation.
The practical range of strength and stiffness of carbon epoxy extends from values as low as those provided by fiberglass to as high as those provided by titanium. This range of values is determined by the orientation of the plies to the applied load. Because the strength design requirement is a function of the applied load direction, ply orientation and ply sequence must be correct. It is critical during a repair operation to replace each damaged ply with a ply of the same material and orientation or an approved substitute.
Warp is the longitudinal fibers of a fabric. The warp is the high-strength direction due to the straightness of the fibers. A warp clock is used to describe direction of fibers on a diagram, spec sheet, or manufacturer’s sheets. If the warp clock is not available on the fabric, the orientation defaults to zero as the fabric comes off the roll. Therefore, 90° to zero is across the width of the fabric. 90° to zero is also called the fill direction.
Mixing Resins
Epoxy resins, like all multipart materials, must be thoroughly mixed. Some resin systems have a dye added to aid in seeing how well the material is mixed. Since many resin systems do not have a dye, the resin must be mixed slowly and fully for three minutes. Air enters into the mixture if the resin is mixed too fast. If the resin system is not fully mixed, the resin may not cure properly. Make sure to scrape the edges and bottom of the mixing cup to ensure that all resin is mixed correctly.
Do not mix large quantities of quick curing resin. These types of resins produce heat after they are mixed. Smoke can burn or poison you when the resin overheats. Mix only the amount of material that is required. Mix more than one batch if more material is needed than the maximum batch size.
Saturation Techniques
For wet layup repair, impregnate the fabric with resin. It is important to put the right amount of resin on the fabric. Too much or too little resin can affect the strength of the repair. Air that is put into the resin or not removed from the fabric also reduces the repair strength.
Fabric Impregnation With a Brush or Squeegee
The traditional way of impregnating the fabric is by using a brush or squeegee. The technician puts a mold release compound or a release film on a caul plate so that the plies will not adhere to the caul plate. Place a sheet of fabric on the caul plate and apply resin in the middle of the sheet. Use a brush or squeegee to thoroughly wet the fabric. More plies of fabric and resin are added and the process is repeated until all plies are impregnated.
A vacuum bag will be used to consolidate the plies and to bleed off excess resin and volatiles. Most wet layup processes have a room temperature cure, but extra heat, up to 150 °F, is used to speed up the curing process. [Figure 8]
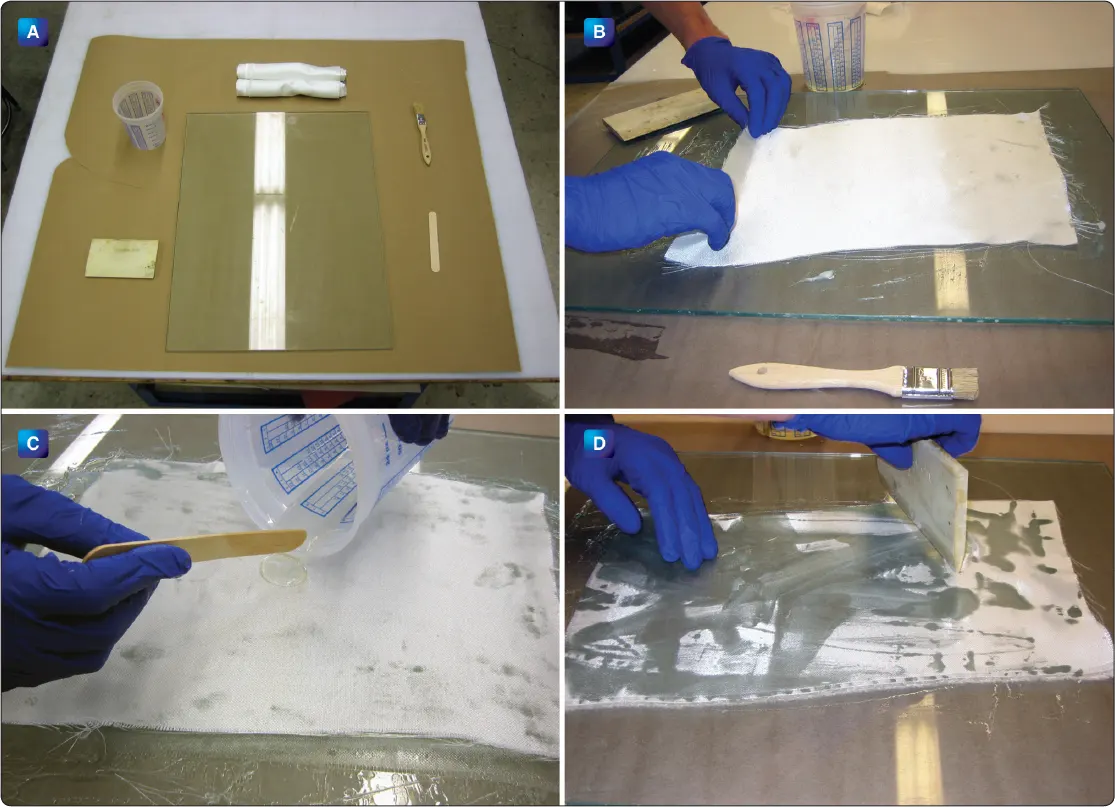 |
| Figure 8. Fabric impregnation with a brush or squeegee: A) wet layup materials; B) fabric placement; C) fabric impregnation; D) squeegee used to thoroughly wet the fabric |
Fabric Impregnation Using a Vacuum Bag
The vacuum-assisted impregnation method is used to impregnate repair fabric with a two-part resin while enclosed inside a vacuum bag. This method is preferred for tight-knit weaves and when near optimum resin-to-fiber ratio is required. Compared to squeegee impregnation, this process reduces the level of entrapped air within the fabric and offers a more controlled and contained configuration for completing the impregnation process.
Vacuum-assisted impregnation consists of the following steps:
- Place vacuum bag sealing tape on the table surface around the area that is used to impregnate the material. The area should be at least 4 inches larger than the material to be impregnated.
- Place an edge breather cloth next to the vacuum bag sealing tape. The edge breather should be 1–2 inches wide.
- Place a piece of solid parting film on the table. The sheet should be 2 inches larger than the material to be impregnated.
- Weigh the fabric to find the amount of resin mix that is necessary to impregnate the material.
- Lay the fabric on the parting film.
- Put a piece of breather material between the fabric and the edge breather to provide an air path.
- Pour the resin onto the fabric. The resin should be a continuous pool in the center area of the fabric.
- Put vacuum probes on the edge breather.
- Place a second piece of solid parting film over the fabric. This film should be the same size or larger than the first piece.
- Place and seal the vacuum bag, and apply vacuum to the bag.
- Allow 2 minutes for the air to be removed from the fabric.
- Sweep the resin into the fabric with a squeegee. Slowly sweep the resin from the center to the edge of the fabric. The resin should be uniformly distributed throughout the fabric.
- Remove the fabric and cut the repair plies.
Vacuum Bagging Techniques
Vacuum bag molding is a process in which the layup is cured under pressure generated by drawing a vacuum in the space between the layup and a flexible sheet placed over it and sealed at the edges. In the vacuum bag molding process, the plies are generally placed in the mold by hand layup using prepreg or wet layup. High-flow resins are preferred for vacuum bag molding.
Single Side Vacuum Bagging
This is the preferred method if the repair part is large enough for a vacuum bag on one side of the repair. The vacuum bag is taped in place with tacky tape and a vacuum port is placed through the bag to create the vacuum.
Envelope Bagging
Envelope bagging is a process in which the part to be repaired is completely enclosed in a vacuum bag or the bag is wrapped around the end of the component to obtain an adequate seal. It is frequently used for removable aircraft parts, such as flight controls, access panels, etc., and when a part’s geometry and/or the repair location makes it very difficult to properly vacuum bag and seal the area in a vacuum.
In some cases, a part may be too small to allow installation of a single-side bag vacuum. Other times, the repair is located on the end of a large component that must have a vacuum bag wrapped around the ends and sealed all the way around. [Figure 9]
 |
| Figure 9. Envelope bagging of repair |
Alternate Pressure Application
Shrink Tape
Another method of pressure application for oven cures is the use of shrink wrapping or shrink tape. This method is commonly used with parts that have been filament wound, because many of the same application rules apply. The tape is wrapped around the completed layup, usually with only a layer of release material between the tape and the layup. Heat is applied to the tape, usually using a heat gun to make the tape shrink, a process that can apply a tremendous amount of pressure to the layup. After shrinking, the part is placed in the oven for cure. High quality parts can be made inexpensively using shrink tape.
C-Clamps
Parts can also be pressed together with clamps. This technique is used for solid laminate edges of honeycomb panels. Clamps (e.g., C-clamps and spring clamps) are used for pressing together the edges of components and/or repair details. Always use clamps with pressure distribution pads because damage to the part may occur if the clamping force is too high. Spring clamps can be used in applications where resin squeeze-out during cure would require C-clamps to be retightened periodically.
Shotbags and Weights
Shotbags and weights can be used also to provide pressure, but their use is limited due to the low level of pressure imposed.
Curing of Composite Materials
A cure cycle is the time/temperature/pressure cycle used to cure a thermosetting resin system or prepreg. The curing of a repair is as important as the curing of the original part material. Unlike metal repairs in which the materials are premanufactured, composite repairs require the technician to manufacture the material. This includes all storage, processing, and quality control functions.
An aircraft repair’s cure cycle starts with material storage. Materials that are stored incorrectly can begin to cure before they are used for a repair. All time and temperature requirements must be met and documented. Consult the aircraft structural repair manual to determine the correct cure cycle for the part that needs to be repaired.
Room Temperature Curing
Room temperature curing is the most advantageous in terms of energy savings and portability. Room temperature cure wet layup repairs do not restore either the strength or the durability of the original 250 °F or 350 °F cure components and are often used for wet layup fiberglass repairs for noncritical components. Room temperature cure repairs can be accelerated by the application of heat. Maximum properties are achieved at 150 °F. A vacuum bag can be used to consolidate the plies and to provide a path for air and volatiles to escape.
Elevated Temperature Curing
All prepreg materials are cured with an elevated temperature cure cycle. Some wet layup repairs use an elevated cure cycle as well to increase repair strength and to speed up the curing process. Curing ovens and heat bonders use a vacuum bag to consolidate the plies and to provide a path for air and volatiles to escape.
The autoclave uses vacuum and positive pressure to consolidate the plies and to provide a path for air and volatiles to escape. Most heating devices use a programmable computer control to run the cure cycles. The operator can select from a menu of available cure cycles or write their own program.
Thermocouples are placed near the repair, and they provide temperature feedback for the heating device. Typical curing temperatures for composite materials are 250 °F and 350 °F. The temperature of large parts cured in an oven or autoclave might differ from the oven or autoclave air temperature during the cure cycle, because they act like a heat sink. The part temperature is most important for a correct cure, so thermocouples are placed on the part to monitor and control part temperature.
The oven or autoclave air temperature probe that measures oven or autoclave temperature is not always a reliable device to determine part curing temperature. The oven temperature and the part temperature can be substantially different if the part or tool acts as a heat sink.
The elevated cure cycle consists of at least three segments:
- Ramp up: The heating device ramps up at a set temperature typically between 3 °F to 5 °F per minute.
- Hold or soak: The heating device maintains the temperature for a predetermined period.
- Cool down: The heating device cools down at a set temperature. Cool down temperatures are typically below 5 °F per minute. When the heating device is below 125 °F, the part can be removed. When an autoclave is used for curing parts, make sure that the pressure in the autoclave is relieved before the door is opened. [Figure 10]
 |
| Figure 10. Autoclave cure |
The curing process is accomplished by the application of heat and pressure to the laminate. The resin begins to soften and flow as the temperature is increased. At lower temperatures, very little reaction occurs. Any volatile contaminants, such as air and/or water, are drawn out of the laminate with vacuum during this time.
The laminate is compacted by applying pressure, usually vacuum (atmospheric pressure); autoclaves apply additional pressure, typically 50–100 psi. As the temperature approaches the final cure temperature, the rate of reaction greatly increases, and the resin begins to gel and harden. The hold at the final cure lets the resin finish curing and attain the desired structural properties.
Quick Review: Composite Repairs and Layup Techniques
What is the difference between storage life, mechanical life, and handling life for prepregs?
- Storage Life: The maximum time a prepreg can be kept in a freezer below 0°F (typically 6 months to a year).
- Mechanical Life: The total cumulative time the material is allowed at room temperature before it begins to chemically cure and must be discarded.
- Handling Life: The recommended room-temperature window to complete layup and compaction, which is shorter than the mechanical life.
Why must frozen prepreg rolls remain in sealed bags until completely thawed?
Why does co-curing a skin over a honeycomb core reduce its compressive strength?
What are the three distinct segments of an elevated temperature cure cycle?
- Ramp Up: Temperature is increased slowly at a rate of 3°F to 5°F per minute to allow resins to soften, flow, and release trapped volatiles under vacuum.
- Hold (Soak): The target cure temperature (typically 250°F or 350°F) is maintained for a set period to let the resin gel, cross-link, and fully harden.
- Cool Down: The temperature is lowered gradually at a rate below 5°F per minute to prevent residual thermal stresses and part warpage. The vacuum bag can be safely removed once the part drops below 125°F.
RELATED POSTS