It is required to have an IA involved in the process of recovering a fabric aircraft because re-covering is a major repair or major alteration. Signatures are required in the aircraft logbook. To ensure work progresses as required, the IA should be involved from the beginning, as well as at various stages throughout the process.
This section describes steps common to various STC and manufacturer covering processes, as well as the differences of some processes. To aid in proper performance of fabric covering and repair procedures, STC holders produce illustrated, step-by-step instructional manuals and videos that demonstrate the correct covering procedures. These training aids are invaluable to the inexperienced technician.
Since modern fabric coverings last indefinitely, a rare opportunity to inspect the aircraft exists during the recovering process. Inspectors and owner-operators should use this opportunity to perform a thorough inspection of the aircraft before new fabric is installed.
The method of fabric attachment should be identical, as far as strength and reliability are concerned, to the method used by the manufacturer of the aircraft being recovered or repaired. Carefully remove the old fabric from the airframe, noting the location of inspection covers, drain grommets, and method of attachment. Either the envelope method or blanket method of fabric covering is acceptable, but a choice must be made prior to beginning the re-covering process.
Blanket Method vs. Envelope Method
In the blanket method of re-covering, multiple flat sections of fabric are trimmed and attached to the airframe. Certified greige polyester fabric for covering an aircraft can be up to 70 inches in width and used as it comes off the bolt. Each aircraft must be considered individually to determine the size and layout of blankets needed to cover it. A single blanket cut for each small surface (i.e., stabilizers and control surfaces) is common. Wings may require two blankets that overlap. Fuselages are covered with multiple blankets that span between major structural members, often with a single blanket for the bottom. Very large wings may require more than two blankets of fabric to cover the entire top and bottom surfaces. In all cases, the fabric is adhered to the airframe using the approved adhesives, following specific rules for the covering process being employed. [Figure 1]
 |
| Figure 1. Laying out fabric during a blanket method re-covering job |
An alternative method of re-covering, the envelope method, saves time by using precut and pre-sewn envelopes of fabric to cover the aircraft. The envelopes must be sewn with approved machine sewing thread, edge distance, fabric fold, etc., such as those specified in AC 43.13-1 or an STC. Patterns are made and fabric is cut and stitched so that each major surface, including the fuselage and wings, can be covered with a single, close-fitting envelope. Since envelopes are cut to fit, they are slid into position, oriented with the seams in the proper place, and attached with adhesive to the airframe. Envelope seams are usually located over airframe structure in inconspicuous places, such as the trailing edge structures and the very top and bottom of the fuselage, depending on airframe construction. Follow the manufacturer’s or STC’s instructions for proper location of the sewn seams of the envelope when using this method. [Figure 2]
 |
| Figure 2. A custom-fit presewn fabric envelope is slid into position over a fuselage for the envelope method of fabric covering. Other than fitting, most steps in the covering process are the same as with the blanket covering method |
Preparation for Fabric Covering Work
Proper preparation for re-covering a fabric aircraft is essential. First, assemble the materials and tools required to complete the job. The holder of the STC usually supplies a materials and tools list either separately or in the STC manual. Control of temperature, humidity, and ventilation is needed in the work environment. If ideal environmental conditions cannot be met, additives are available that compensate for this for most re-covering products.
Rotating work stands for the fuselage and wings provide easy, alternating access to the upper and lower surfaces while the job is in progress. [Figure 3]
 |
| Figure 3. Rotating stands and sawhorses facilitate easy access to top and bottom surfaces during the fabric covering process |
They can be used with sawhorses or sawhorses can be used alone to support the aircraft structure while working. A workbench or table, as well as a rolling cart and storage cabinet, is also recommended. Figure 4 shows a well-conceived fabric covering workshop. A paint spray booth for sprayed-on coatings and space to store components awaiting work is also recommended.
 |
| Figure 4. Some components of a work area for covering an aircraft with fabric |
Many of the substances used in most re-covering processes are highly toxic. Proper protection must be used to avoid serious short- and long-term adverse health effects. Eye protection, a proper respirator, and skin protection are vital. As mentioned, nitrate dope is very flammable. Proper ventilation and a rated fire extinguisher should be on hand when working with this and other covering process materials. Grounding of work to prevent static electricity build-up may be required. All fabric re-covering processes also involve multiple coats of various products that are sprayed onto the fabric surface. Use of a high-volume, low-pressure (HVLP) sprayer is recommended. Good ventilation is needed for all of the processes.
Removal of Old Fabric Coverings
Removal of the old covering is the first step in replacing an aircraft fabric covering. Cut away the old fabric from the airframe with razor blades or a utility knife. Care should be taken to ensure that no damage is done to the airframe. [Figure 5] To use the old covering for templates in transferring the location of inspection panels, cable guides, and other features to the new covering, the old covering should be removed in large sections.
 |
| Figure 5. Old fabric coverings are cut off in large pieces to preserve them as templates for locating various airframe features. Sharp blades and care must be used to avoid damaging the structure |
Preparation of the Airframe Before Covering
Once the old fabric has been removed, the exposed airframe structure must be thoroughly cleaned and inspected. The IA collaborating on the job should be involved in this step of the process. Details of the inspection should follow the manufacturer’s guidelines, the STC, or AC 43.13-1. All of the old adhesive must be completely removed from the airframe with solvent, such as MEK. A thorough inspection must be done and various components may be selected to be removed for cleaning, inspection, and testing. Any repairs that are required, including the removal and treatment of all corrosion, must be done at this time. If the airframe is steel tubing, many technicians take the opportunity to grit blast the entire airframe at this stage.
The leading edge of a wing is a critical area where airflow diverges and begins its laminar flow over the wing’s surfaces, which results in the generation of lift. It is beneficial to have a smooth, regular surface in this area. Plywood leading edges must be sanded until smooth, bare wood is exposed. If oil or grease spots exist, they must be cleaned with naphtha or other specified cleaners. If there are any chips, indentations, or irregularities, approved filler may be spread into these areas and sanded smooth. The entire leading edge should be cleaned before beginning the fabric covering process.
To obtain a smooth finish on fabric-covered leading edges of aluminum wings, a sheet of felt or polyester padding may be applied before the fabric is installed. This should only be done with the material specified in the STC under which the technician is working. The approved padding ensures compatibility with the adhesives and first coatings of the covering process. When a leading edge pad is used, check the STC process instructions for permission to make a cemented fabric seam over the padding. [Figure 6]
 |
| Figure 6. The use of specified felt or padding over the wing leading edges before the fabric is installed results in a smooth regular surface |
When completely cleaned, inspected, and repaired, an approved primer, or varnish if it is a wood structure, should be applied to the airframe. This step is sometimes referred to as dope proofing. Exposed aluminum must first be acid etched. Use the product(s) specified by the manufacturer or in the STC to prepare the metal before priming. Two-part epoxy primers and varnishes, which are not affected by the fabric adhesive and subsequent coatings, are usually specified. One part primers, such as zinc chromate and spar varnish, are typically not acceptable. The chemicals in the adhesives dissolve the primers, and adhesion of the fabric to the airframe is lost.
Sharp edges, metal seams, the heads of rivets, and any other feature on the aircraft structure that might cut or wear through the fabric should be covered with anti-chafe tape. As described above, this cloth sticky-back tape is approved and should not be substituted with masking or any other kind of tape. Sometimes, rib cap strips need to have anti-chafe tape applied when the edges are not rounded over. [Figure 7]
 |
| Figure 7. Anti-chafe tape is applied to all features that might cut or wear through the fabric |
Inter-rib bracing must also be accomplished before the fabric is installed. It normally does not have an adhesive attached to it and is wrapped only once around each rib. The single wrap around each rib is enough to hold the ribs in place during the covering process but allows small movements during the fabric shrinking process. [Figure 8]
 |
| Figure 8. Inter-rib bracing holds the ribs in place during the re-covering process |
Attaching Polyester Fabric to the Airframe
Inexperienced technicians are encouraged to construct a test panel upon which they can practice with the fabric and various substances and techniques to be used on the aircraft. It is often suggested to cover smaller surfaces first, such as the empennage and control surfaces. Mistakes on these can be corrected and are less costly if they occur. The techniques employed for all surfaces, including the wings and fuselage, are basically the same. Once dexterity has been established, the order in which one proceeds is often a personal choice.
When the airframe is primed and ready for fabric installation, it must receive a final inspection by an A&P with IA. When approved, attachment of the fabric may begin. The manufacturer’s or STC’s instructions must be followed without deviation for the job to be airworthy. The following are the general steps taken. Each approved process has its own nuances.
Seams
During installation, the fabric is overlapped and seamed together. Primary concerns for fabric seams are strength, elasticity, durability, and good appearance. Whether using the blanket method or envelope method, position all fabric seams over airframe structure to which the fabric is to be adhered during the covering process, whenever possible. Unlike the blanket method, fabric seam overlap is predetermined in the envelope method. Seams sewn to the specifications in AC 43.13-1, the STC under which the work is being performed, or the manufacturer’s instructions should perform adequately.
Most covering procedures for polyester fabric rely on doped or glued seams as opposed to sewn seams. They are simple and easy to make and provide excellent strength, elasticity, durability, and appearance. When using the blanket method, seam overlap is specified in the covering instructions and the FAA-certificated A&P mechanic must adhere to these specifications. Typically, a minimum of two to four inches of fabric overlap seam is required where ends of fabric are joined in areas of critical airflow, such as the leading edge of a wing. One to two inches of overlap is often the minimum in other areas.
When using the blanket method, options exist for deciding where to overlap the fabric for coverage. Function and the final appearance of the covering job should be considered. For example, fabric seams made on the wing’s top surface of a high wing aircraft are not visible when approaching the aircraft. Seams on low wing aircraft and many horizontal stabilizers are usually made on the bottom of the wing for the same reason. [Figure 9]
 |
| Figure 9. For appearance, fabric can be overlapped differently on high wing and low wing aircraft |
Fabric Seams
Seams parallel to the line of flight are preferable; however, spanwise seams are acceptable.
Sewn Seams
Machine-sewn seams should be double stitched using any of the styles illustrated in Figure 10 A, B, C, or D. A machine-sewn seam used to close an envelope at a wingtip, wing trailing edge, empennage and control surface trailing edge, and a fuselage longeron may be made with a single stitch when the seam will be positioned over a structure. [Figure 10E] The envelope size should accommodate fittings or other small protrusions with minimum excess for installation. Thick or protruding leading edge sewn seams should be avoided on thin airfoils with a sharp leading edge radius because they may act as a stall strip.
 |
| Figure 10. Fabric Seams |
Hand sew, with plain overthrow or baseball stitches at a minimum of four stitches per inch, or permanent tacking, to the point where uncut fabric or a machine-sewn seam is reached. Lock hand sewing at a maximum of 10 stitch intervals with a double half hitch, and tie off the end stitch with a double half hitch. At the point where the hand-sewing or permanent tacking is necessary, cut the fabric so that it can be doubled under a minimum of 3/8 inch before sewing or permanent tacking is performed.
After hand sewing is complete, any temporary tacks used to secure the fabric over wood structures may be removed.
Cover a sewn spanwise seam on a wing’s leading edge with a minimum 4-inch wide pinked-edged surface tape with the tape centered on the seam.
Cover a spanwise-sewn seam at the wing trailing edge with pinked-edge surface tape that is at least 3 inches wide. For aircraft with never-exceed speeds in excess of 200 mph, cut V notches at least 1 inch in depth and 1/4 inch in width in both edges of the surface tape when used to cover spanwise seams on trailing edges of control surfaces. Space notches at intervals not exceeding 6 inches. On tape less than 3 inches wide, the notches should be 1/3 the tape width. In the event the surface tape begins to separate because of poor adhesion or other causes, the tape will tear at a notched section, thus preventing progressive loosening of the entire length of the tape which could seriously affect the controllability of the aircraft. A loose tape acts as a trim tab only on a movable surface. It becomes a spoiler on a fixed surface and has no effect at the trailing edge other than drag.
Make spanwise-sewn seams on the wing’s upper or lower surfaces in a manner that will minimize any protrusions. Cover the seams with finishing tape at least 3 inches wide, centering the tape on the seam.
Sewn seams parallel to the line of flight (chordwise) may be located over ribs. However, careful attention must be given to avoid damage to the seam threads by rib lace needles, screws, rivets, or wire clips that are used to attach the fabric to the rib. Cover chordwise seams with a finishing tape at least 3 inches wide with the tape centered on the seam.
Doped Seams
For an overlapped and doped span-wise seam on a wing’s leading edge, overlap the fabric at least 4 inches and cover with finishing tape at least 4 inches wide, with the tape centered at the outside edge of the overlap seam.
For an overlapped and doped span-wise seam at the trailing edge, lap the fabric at least 3 inches and cover with pinked-edge surface tape at least 4 inches wide, with the tape centered on the outside edge of the overlap seam.
For an overlapped and doped seam on wingtips, wing butts, perimeters of wing control surfaces, perimeters of empennage surfaces, and all fuselage areas, overlap the fabric 2 inches and cover with a finishing tape that is at least 3 inches wide, centered on the outside edge of the overlap seam.
For an overlapped and doped seam on a wing’s leading edge, on aircraft with a velocity never exceed speed (VNE) up to and including 150 mph, overlap the fabric 2 inches and cover with a finishing tape that is at least 3 inches wide, with the tape centered on the outside edge of the overlap seam.
For an overlapped and doped seam on the perimeter of a wing (except a leading edge), perimeters of wing control surfaces, perimeters of empennage surfaces, and all areas of a fuselage, on aircraft with a VNE speed up to and including 150 mph, overlap the fabric 1 inch and cover with a finishing tape that is at least 3 inches wide, centered on the outside edge of the overlap seam.
Fabric Cement
A polyester fabric covering is cemented or glued to the airframe structure at all points where it makes contact. Special formula adhesives have replaced nitrate dope for adhesion in most covering processes. The adhesive (as well as all subsequent coating materials) should be mixed for optimum characteristics at the temperature at which the work is being performed. Follow the manufacturer’s or STC’s guidance when mixing.
To attach the fabric to the airframe, first pre-apply two coats of adhesive to the structure at all points the fabric is to contact it. (It is important to follow the manufacturer’s or STC’s guidance as all systems are different.) Allow these to dry. The fabric is then spread over the surface and clamped into position. It should not be pulled tighter than the relaxed but not wrinkled condition it assumes when lying on the structure. Clamps or clothespins are used to attach the fabric completely around the perimeter. The Stewart System STC does not need clamps because the glue assumes a tacky condition when precoated and dried. There is sufficient adhesion in the precoat to position the fabric.
The fabric should be positioned in all areas before undertaking final adhesion. Final adhesion often involves lifting the fabric, applying a wet bed of cement, and pressing the fabric into the bed. An additional coat of cement over the top of the fabric is common. Depending on the process, wrinkles and excess cement are smoothed out with a squeegee or are ironed out. The Stewart System calls for heat activation of the cement precoats through the fabric with an iron while the fabric is in place. Follow the approved instructions for the covering method being used.
Fabric Heat Shrinking
Once the fabric has been glued to the structure, it can be made taut by heat shrinking. This process is done with an ordinary household iron that the technician calibrates before use. A smaller iron is also used to iron in small or tight places. [Figure 11]
 |
| Figure 11. Irons used during the fabric covering process |
The iron is run over the entire surface of the fabric. Follow the instructions for the work being performed. Some processes avoid ironing seams while other processes begin ironing over structure and move to spanned fabric or vice versa. It is important to shrink the fabric evenly. Starting on one end of a structure and progressing sequentially to the other end is not recommended. Skipping from one end to the other, and then to the middle, is more likely to evenly draw the fabric tight. [Figure 12]
 |
| Figure 12. An example of a wing fabric ironing procedure designed to evenly taughten the fabric |
The amount that polyester fabric shrinks is directly related to the temperature applied. Polyester fabric can shrink nearly 5 percent at 250 °F and 10 percent at 350 °F. It is customary to shrink the fabric in stages, using a lower temperature first, before finishing with the final temperature setting. The first shrinking is used to remove wrinkles and excess fabric. The final shrinking gives the finished tautness desired. Each process has its own temperature regime for the stages of tautening. Typically ranging from 225 °F to 350 °F, it is imperative to follow the process instructions. Not all fabric covering processes use the same temperature range and maximum temperature. Ensure irons are calibrated to prevent damage at high temperature settings.
Attaching Fabric to the Wing Ribs
Once the fabric has been tautened, covering processes vary. Some require a sealing coat be applied to the fabric at this point. It is usually put on by brush to ensure the fibers are saturated. Other processes seal the fabric later. Whatever the process, the fabric on wings must be secured to the wing ribs with more than just cement. The forces caused by the airflow over the wings are too great for cement alone to hold the fabric in place. As described in the materials section, screws, rivets, clips, and lacing hold the fabric in place on manufactured aircraft. Use the same attachment method as used by the original aircraft manufacturer. Deviation requires a field approval. Note that fuselage and empennage attachments may be used on some aircraft. Follow the methodology for wing rib lacing described below and the manufacturer’s instructions for attach point locations and any possible variations to what is presented here.
Care must always be taken to identify and eliminate any sharp edges that might wear through the fabric. Reinforcing tape of the exact same width as the rib cap is installed before any of the fasteners. This approved sticky-back tape helps prevent the fabric from tearing. [Figure 13] Then, screws, rivets, and clips simply attach into the predrilled holes in the rib caps to hold the fabric to the caps. Rib lacing is a more involved process whereby the fabric is attached to the ribs with cord.
 |
| Figure 13. Reinforcing tape the same width as the wing ribs is applied over all wing ribs |
Rib Lacing
There are two kinds of rib lacing cord. One has a round cross-section and the other flat. Which to use is a matter of preference based on ease of use and final appearance. Only approved rib lacing cord can be used. Unless a rib is unusually deep from top to bottom, rib lacing uses a single length of cord that passes completely through the wing from the upper surface to the lower surface thereby attaching the top and bottom skin to the rib simultaneously.
Holes are laid out and pre-punched through the skin as close to the rib caps as possible to accept the lacing cord. [Figure 14]
 |
| Figure 14. A premarked location for a lacing hole, which is punched through the fabric with a pencil |
This minimizes leverage the fabric could develop while trying to pull away from the structure and prevents tearing. The location of the holes is not arbitrary. The spacing between lacing holes and knots must adhere to manufacturer’s instructions, if available. STC lacing guidance refers to manufacturer’s instructions or to that shown on the chart in Figure 15 which is taken from AC 43.13-1.
 |
| Figure 15. A rib lacing spacing chart. Unless manufacturer data specifies otherwise, use the spacing indicated |
Notice that because of greater turbulence in the area of the propeller wash, closer spacing between the lacing is required there. This slipstream is considered to be the width of the propeller plus one additional rib. Ribs are normally laced from the leading edge to the trailing edge of the wing.
Rib lacing is done with a long curved needle to guide the cord in and out of holes and through the depth of the rib.
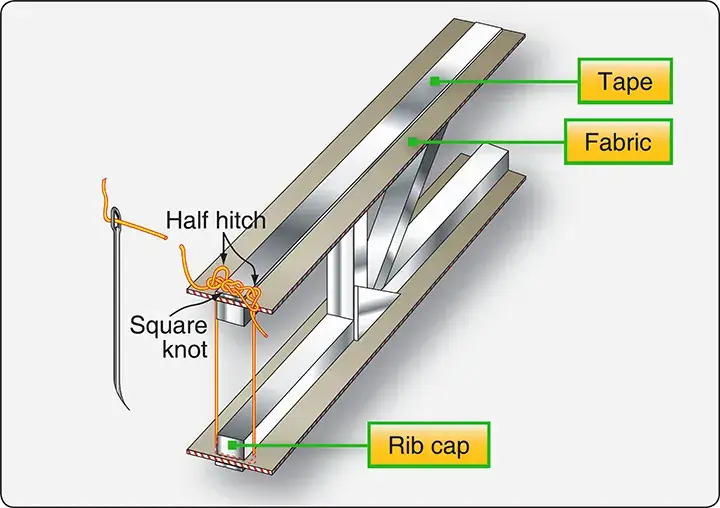
The knots are designed not to slip under the forces applied and can be made in a series out of a single strand of lacing. Stitching can begin at the leading edge or trailing edge. A square knot with a half hitch on each side is typically used for the first knot when lacing a rib. [Figure 16]
 |
| Figure 16. A starter knot for rib lacing can be a square knot with a half hitch on each side |
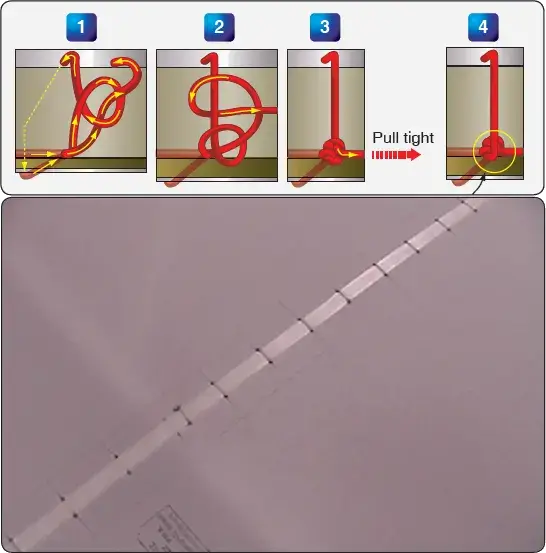
This is followed by a series of modified seine knots until the final knot is made and secured with a half hitch. [Figure 17]
 |
| Figure 17. In this example of rib lacing, modified seine knots are used and shown above the fabric surface. Hidden modified seine knots are common. They are made so that the knots are pushed or pulled below the fabric surface |
Hidden modified seine knots are also used. These knots are placed below the fabric surface so only a single strand of lacing is visible across the rib cap. [Figure 18]
 |
| Figure 18. Hiding rib lacing knots below the fabric surface results in a smooth surface |
Structure and accessories within the wing may prevent a continuous lacing. Ending the lacing and beginning again can avoid these obstacles. Lacing that is not long enough to complete the rib may be ended and a new starting knot can be initiated at the next set of holes. The lacing can also be extended by joining it with another piece of lacing using the splice knot shown in Figure 19.
 |
| Figure 19. The splice knot can be used to join two pieces of rib lacing cord |
Occasionally, lacing to just the rib cap is employed without lacing entirely through the wing and incorporating the cap on the opposite side. This is done where ribs are exceptionally deep or where through lacing is not possible, such as in an area where a fuel tank is installed. Changing to a needle with a tighter radius facilitates threading the lacing cord in these areas. Knotting procedures remain unchanged.
Technicians inexperienced at rib lacing should seek assistance to ensure the correct knots are being tied. STC holder videos are invaluable in this area. They present repeated close-up visual instruction and guidance to ensure airworthy lacing. AC 43.13-1, Chapter 2, Fabric Covering, also has in-depth instructions and diagrams as do some manufacturer’s manuals and STC’s instructions.
Rings, Grommets, and Gussets
When the ribs are laced and the fabric covering completely attached, the various inspection rings, drain grommets, reinforcing patches, and finishing tapes are applied. Inspection rings aid access to critical areas of the structure (pulleys, bell cranks, drag/anti-drag wires, etc.) once the fabric skin is in place. They are plastic or aluminum and normally cemented to the fabric using the approved cement and procedures. The area inside the ring is left intact. It is removed only when inspection or maintenance requires access through that ring. Once removed, preformed inspection panels are used to close the opening. The rings should be positioned as specified by the manufacturer. Lacking that information, they should be positioned as they were on the previous covering fabric. Additional rings should be installed by the technician if it is determined a certain area would benefit from access in the future. [Figure 20]
 |
| Figure 20. This inspection ring was cemented into place on the fabric covering. The approved technique specifies the use of a fabric overlay that is cemented over the ring and to the fabric |
Water from rain and condensation can collect under the fabric covering and needs a way to escape. Drain grommets serve this purpose. There are a few different types as described in the materials section above. All are cemented into position in accordance with the approved process under which the work is being performed. Locations for the drain grommets should be ascertained from manufacturer’s data. If not specified, AC 43.13-1 has acceptable location information. Each fabric covering STC may also give recommendations. Typically, drain grommets are located at the lowest part of each area of the structure (e.g., bottom of the fuselage, wings, empennage). [Figure 21] Each rib bay of the wings is usually drained with one or two grommets on the bottom of the trailing edge. Note that drain holes without grommets are sometimes approved in reinforced fabric.
 |
| Figure 21. Drain grommets cemented into place on the bottom side of a control surface |
It is possible that additional inspection rings and drain grommets have been specified after the manufacture of the aircraft. Check the Airworthiness Directives (ADs) and Service Bulletins for the aircraft being re-covered to ensure required rings and grommets have been installed.
Cable guide openings, strut-attach fitting areas, and similar features, as well as any protrusions in the fabric covering, are reinforced with fabric gussets. These are installed as patches in the desired location. They should be cut to fit exactly around the feature they reinforce to support the original opening made in the covering fabric. [Figure 22] Gussets made to keep protrusions from coming through the fabric should overlap the area they protect. Most processes call for the gusset material to be preshrunk and cemented into place using the approved covering process cementing procedures.
 |
| Figure 22. A strut fitting and cable guide with reinforcing fabric gussets cemented in place |
Finishing Tapes
Finishing tapes are applied to all seams, edges, and over the ribs once all of the procedures above have been completed. They are used to protect these areas by providing smooth aerodynamic resistance to abrasion. The tapes are made from the same polyester material as the covering fabric. Use of lighter weight tapes is approved in some STCs. Preshrunk tapes are preferred because they react to exposure to the environment in the same way the as the fabric covering. This minimizes stress on the adhesive joint between the two. Straight edged and pinked tapes are available. The pinking provides greater surface area for adhesion of the edges and a smoother transition into the fabric covering. Only tapes approved in the STC under which work is being accomplished may be used to be considered airworthy.
Finishing tapes from one to six inches in width are used. Typically, two inch tapes cover the rib lacing and fuselage seams. Wing leading edges usually receive the widest tape with four inches being common. [Figure 23] Bias cut tapes are often used to wrap around the curved surfaces of the airframe, such as the wing tips and empennage surface edges. They lay flat around the curves and do not require notching. Finishing tapes are attached with the process adhesive or the nitrate dope sealer when using a dope-based process. Generally, all chordwise tapes are applied first followed by the span-wise tapes at the leading and trailing edges. Follow the manufacturer’s STC or AC 43.13-1 instructions.
 |
| Figure 23. Cement is brushed through a four-inch tape during installation over the fabric seam on a wing leading edge. Two-inch tapes cover the wing ribs and rib lacing |
Coating the Fabric
The sealer coat in most fabric covering processes is applied after all finishing tapes have been installed unless it was applied prior to rib lacing as in a dope-based finishing process. This coat saturates and completely surrounds the fibers in the polyester fabric, forming a barrier that keeps water and contaminants from reaching the fabric during its life. It is also used to provide adhesion of subsequent coatings. Usually brushed on in a cross coat application for thorough penetration, two coats of sealer are commonly used but processes vary on how many coats and whether spray coating is permitted.
With the sealer coats installed and dried, the next step provides protection from UV light, the only significant cause of deterioration of polyester fabric. Designed to prevent UV light from reaching the fabric and extend the life of the fabric indefinitely, these coating products, or fill coats, contain aluminum solids premixed into them that block the UV rays. They are sprayed on in the number of cross coats as specified in the manufacturer’s STC or AC 43.13-1 instructions under which work is done. Two to four cross coats is common. Note that some processes may require coats of clear butyrate before the blocking formula is applied.
Fabric primer is a coating used in some approved covering processes that combines the sealer and fill coatings into one. Applied to fabric after the finishing tapes are installed, these fabric primers surround and seal the fabric fibers, provide good adhesion for all of the following coatings, and contain UV blocking agents. One modern primer contains carbon solids and others use chemicals that work similarly to sun block for human skin. Typically, two to four coats of fabric primer are sufficient before the top coatings of the final finish are applied. [Figure 24]
 |
| Figure 24. Applying a primer with UV blocking by spraying cross coats |
The FAA-certificated mechanic must strictly adhere to all instructions for thinning, drying times, sanding, and cleaning. Small differences in the various processes exist and what works in one process may not be acceptable and could ruin the finish of another process. STCs are issued on the basis of the holder having successfully proven the effectiveness of both the materials and the techniques involved.
When the fill coats have been applied, the final appearance of the fabric covering job is crafted with the application of various topcoats. Due to the chemical nature of the fill coating upon which topcoats are sprayed, only specified materials can be used for top coating to ensure compatibility. Colored butyrate dope and polyurethane paint finishes are most common. They are sprayed on according to instructions.
Once the topcoats are dry, the trim (N numbers, stripes, etc.) can be added. Strict observation of drying times and instructions for buffing and waxing are critical to the quality of the final finish. Also, note that STC instructions may include insight on finishing the nonfabric portions of the airframe to best match the fabric covering finish.
What is the difference between the blanket and envelope methods?
How much does polyester aircraft fabric shrink?
Why is rib lacing spacing closer near the propeller?
What is "dope proofing" in airframe preparation?
RELATED POSTS