Carburetor Removal
The removal procedures vary with both the type of carburetor concerned and the type of engine on which it is used. Always refer to the applicable manufacturer’s technical instructions for a particular installation. Generally, the procedures are much the same, regardless of the type of carburetor concerned.Before removing a carburetor, make sure the fuel shutoff (or selector) valve is closed. Disconnect the throttle and mixture control linkages, and lockwire the throttle valve in the closed position. Disconnect the fuel inlet line and all vapor return, gauge, and primer lines. If the same carburetor is to be re-installed, do not alter the rigging of the throttle and mixture controls. Remove the airscoop or airscoop adapter. Remove the air screens and gaskets from the carburetor. Remove the nuts and washers securing the carburetor to the engine. When removing a downdraft carburetor, use extreme care to ensure that nothing is dropped into the engine. Remove the carburetor. Immediately install a protective cover on the carburetor mounting flange of the engine to prevent small parts or foreign material from falling into the engine. When there is danger of foreign material entering open fuel lines during removal or installation of the carburetor, plug them using the proper cover fittings.
Installation of Carburetor
Check the carburetor for proper lockwiring before installation on an engine. Be sure that all shipping plugs have been removed from the carburetor openings.Remove the protective cover from the carburetor mounting flange on the engine. Place the carburetor mounting flange gasket in position. On some engines, bleed passages are incorporated in the mounting pad. The gasket must be installed so that the bleed hole in the gasket is aligned with the passage in the mounting flange.
Inspect the induction passages for the presence of any foreign material before installing the carburetor. As soon as the carburetor is placed in position on the engine, close and lockwire the throttle valves in the closed position until the remainder of the installation is completed. Place the carburetor deck screen, when feasible, in position to further eliminate the possibility of foreign objects entering the induction system.
When installing a carburetor that uses diaphragms for controlling fuel flow, connect the fuel lines and fill the carburetor with fuel. To do this, turn on the fuel boost pump and move the mixture control from the idle cutoff position to rich position. Continue the flow until oil-free fuel flows from the drain valve. This indicates that the preservative oil has been flushed from the carburetor. Turn off the fuel flow, plug the fuel inlet and vapor vent outlet, and then allow the carburetor, filled with fuel, to stand for a minimum of 8 hours. This is necessary in order to soak the diaphragms and render them pliable to the same degree as when the unit was originally calibrated. Tighten the carburetor mounting bolts to the value specified in the table of torque limits in the applicable maintenance manual. Tighten and safety any other nuts and bolts incidental to the installation of the carburetor before connecting the throttle and mixture-control levers. After the carburetor has been bolted to the engine, check the throttle and mixture-control lever on the unit for freedom of movement before connecting the control cables or linkage. Check the vapor vent lines or return lines from the carburetor to the aircraft fuel tank for restriction.
Rigging Carburetor Controls
Connect and adjust carburetor or fuel metering equipment throttle controls so that full movement of the throttle is obtained from corresponding full movement of the control in the cockpit. In addition, check and adjust the throttle control linkages so that springback on the throttle quadrant in the aircraft is equal in both the full-open and full-closed positions. Correct any excess play or looseness of control linkage or cables. Controls should be checked so that they go stop-to-stop on the carburetor. Check for complete and full travel of each control.When installing carburetors or fuel metering equipment incorporating manual-type mixture controls that do not have marked positions, adjust the mixture control mechanism to provide an equal amount of springback at both the rich and lean ends of the control quadrant in the cockpit when the mixture control on the carburetor or fuel metering equipment is moved through the full range. Where mixture controls with detents are used, rig the control mechanism so that the designated positions on the control quadrant in the aircraft agree with the corresponding positions on the carburetor or fuel metering equipment. Controls should move freely and smoothly without binding throughout their total travel. In all cases, check the controls for proper positioning in both the advance and retard positions. Correct excess play or looseness of control linkage or cables. Safety all controls properly to eliminate the possibility of loosening from vibration during operation.
Adjusting Idle Mixtures
Excessively rich or lean idle mixtures result in incomplete combustion within the engine cylinder, with resultant formation of carbon deposits on the spark plugs and subsequent spark plug fouling. In addition, excessively rich or lean idle mixtures make it necessary to taxi at high idle speeds with resultant fast taxi speeds and excessive brake wear. Each engine must have the carburetor idle mixture tailored for the particular engine and installation if best operation is to be obtained.Engines that are properly adjusted, insofar as valve operation, cylinder compression, ignition, and carburetor idle mixture are concerned, idle at the prescribed rpm for indefinite periods without loading up, overheating, or spark plug fouling. If an engine does not respond to idle mixture adjustment with the resultant stable idling characteristics previously outlined, some other phase of engine operation is not correct. In such cases, determine and correct the cause of the difficulty. A general guide to check and adjust the idle mixture and speed on many types of reciprocating engine is discussed in the following paragraphs. Always refer to the appropriate manual for specific information.
Before checking the idle mixture on any engine, warm up the engine until oil and cylinder head temperatures are normal. Keep the propeller control in the increase rpm setting throughout the entire process of warming up the engine. Always make idle mixture adjustments with cylinder head temperatures at normal values. The idle mixture adjustment is made on the idle mixture fuel control valve. [Figure 1] It should not be confused with the adjustment of the idle speed stop. The importance of idle mixture adjustment cannot be overstressed. Optimum engine operation at low speeds can be obtained only when proper fuel/air mixtures are delivered to every cylinder of the engine. Excessively rich idle mixtures and the resultant incomplete combustion are responsible for more spark plug fouling than any other single cause. Excessively lean idle mixtures result in faulty acceleration. Furthermore, the idle mixture adjustment affects the fuel/air mixture and engine operation well up into the cruise range.
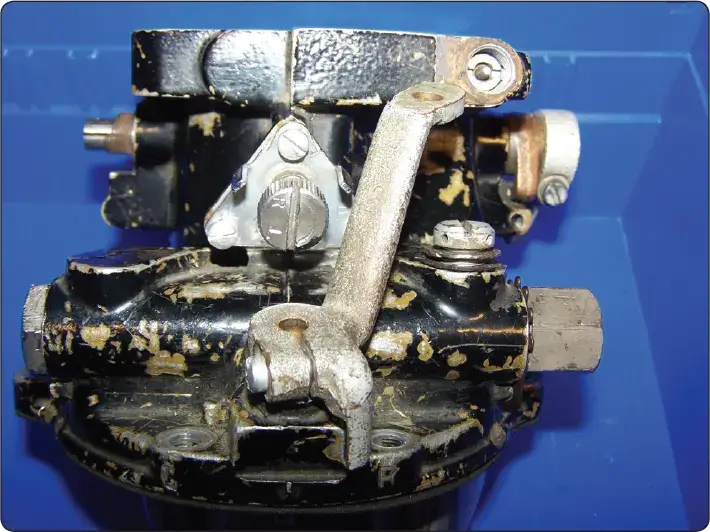 |
| Figure 1. Idle mixture adjustment for carburetor |
On an engine with a conventional carburetor, the idle mixture is checked by manually leaning the mixture with the cockpit mixture control. Move the carburetor mixture control slowly and smoothly toward the idle cutoff position. On installations that do not use a manifold pressure gauge, it is necessary to observe the tachometer for an indication of a rpm change. With most installations, the idle mixture should be adjusted to provide an rpm rise prior to decreasing as the engine ceases to fire. This rpm increase varies from 10 to 50 rpm, depending on the installation. Following the momentary increase in rpm, the engine speed starts to drop. Immediately move the mixture control back to rich to prevent the engine from stopping completely.
On RSA fuel-injection engines, the optimum idle setting is one that is rich enough to provide a satisfactory acceleration under all conditions and lean enough to prevent spark plug fouling or rough operation. A rise of 25–50 rpm as the mixture control is moved to the idle cutoff position usually satisfies both of these conditions. The actual idle mixture adjustment is made by the lengthening or shortening of the linkage between the throttle lever and the idle lever. [Figure 2]
On RSA fuel-injection engines, the optimum idle setting is one that is rich enough to provide a satisfactory acceleration under all conditions and lean enough to prevent spark plug fouling or rough operation. A rise of 25–50 rpm as the mixture control is moved to the idle cutoff position usually satisfies both of these conditions. The actual idle mixture adjustment is made by the lengthening or shortening of the linkage between the throttle lever and the idle lever. [Figure 2]
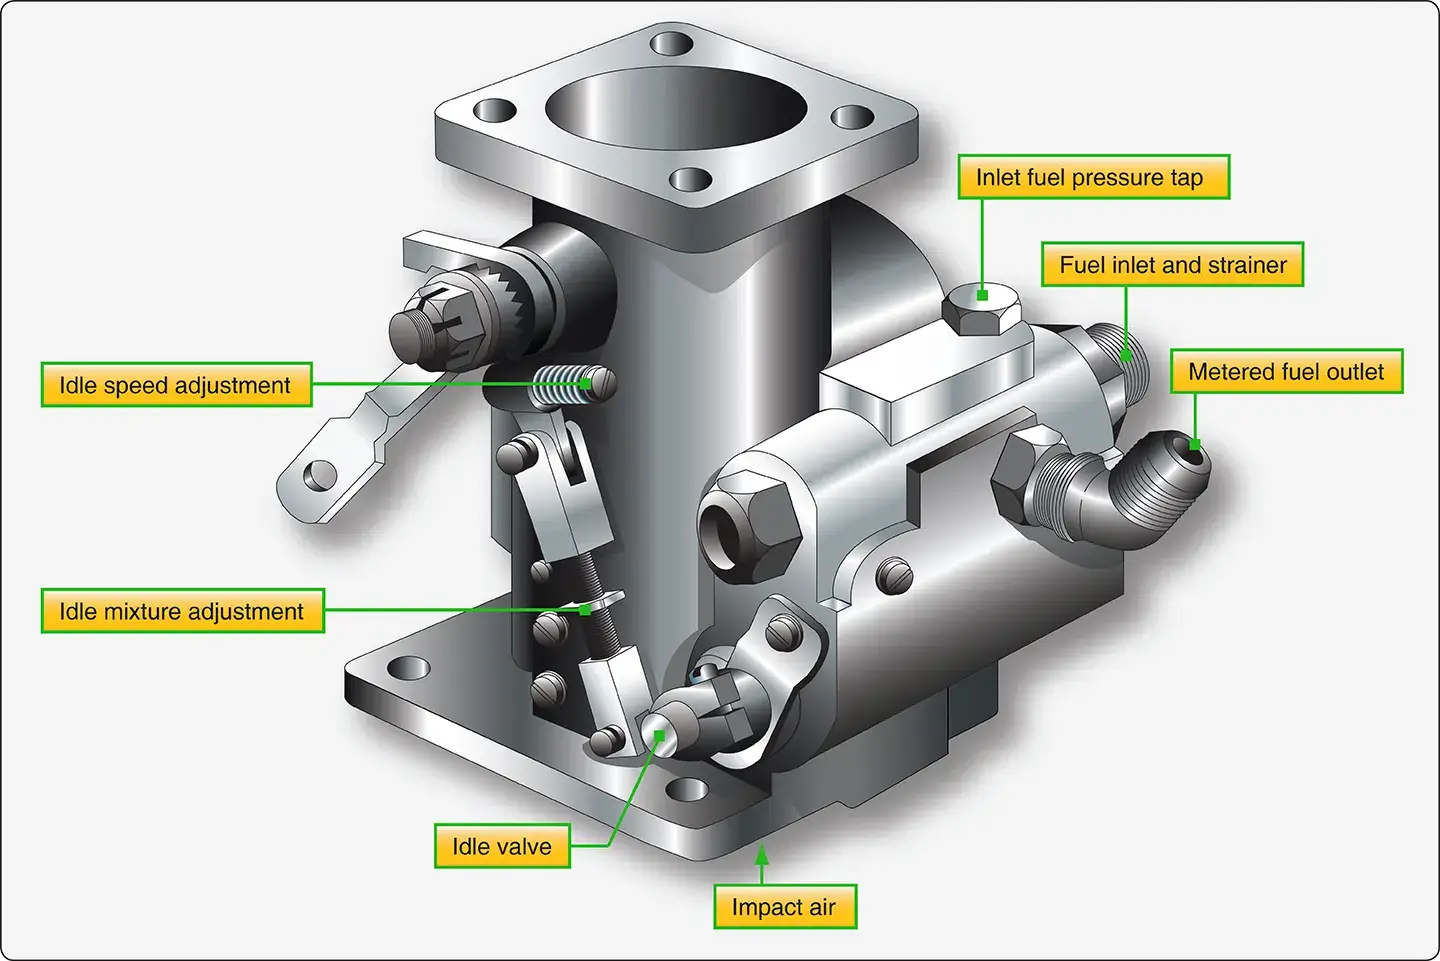 |
| Figure 2. Bendix adjustment of idle mixture linkage |
If the check of the idle mixture reveals it to be too lean or too rich, increase or decrease the idle fuel flow as required. Then, repeat the check. Continue checking and adjusting the idle mixture until it checks out properly. During this process, it may be desirable to move the idle speed stop completely out of the way and to hold the engine speed at the desired rpm by means of the throttle. This eliminates the need for frequent readjustments of the idle stop as the idle mixture is improved and the idle speed picks up. After each adjustment, clear the engine by briefly running it at higher rpm. This prevents fouling of the plugs which might otherwise be caused by incorrect idle mixture. After adjusting the idle mixture, recheck it several times to determine definitively that the mixture is correct and remains constant on repeated changes from high power back to idle. Correct any inconsistency in engine idling before releasing the aircraft for service.
Setting the idle mixture on the continental TCM fuel injection system consist of a conventional spring loaded screw located in the air throttle lever. [Figure 3] The fuel pump pressure is part of the basic calibration and requires servicing to make sure the pump pressure are set correctly before making idle adjustments. The idle mixture adjustment is the locknut at the metering valve end of the linkage between the metering valve and the air throttle levers. Tightening the nut to shorten the linkage provides a richer mixture. A leaner mixture is obtained by backing off the nut to lengthen the linkage. Adjust to obtain a slight and momentary gain in idle speed as the mixture control is slowly moved toward idle cut off. If the idle mixture is set too lean, the idle speed drops with no gain in speed.
Some carburetors are equipped with an eccentric screw to adjust idle rpm. Others use a spring-loaded screw to limit the throttle valve closing. In either case, adjust the screw as required to increase or decrease rpm with the throttle retarded against the stop. Open the throttle to clear the engine; close the throttle and allow the rpm to stabilize. Repeat this operation until the desired idling speed is obtained.
RELATED POSTS
Setting the idle mixture on the continental TCM fuel injection system consist of a conventional spring loaded screw located in the air throttle lever. [Figure 3] The fuel pump pressure is part of the basic calibration and requires servicing to make sure the pump pressure are set correctly before making idle adjustments. The idle mixture adjustment is the locknut at the metering valve end of the linkage between the metering valve and the air throttle levers. Tightening the nut to shorten the linkage provides a richer mixture. A leaner mixture is obtained by backing off the nut to lengthen the linkage. Adjust to obtain a slight and momentary gain in idle speed as the mixture control is slowly moved toward idle cut off. If the idle mixture is set too lean, the idle speed drops with no gain in speed.
 |
| Figure 3. TCM adjustment points |
Idle Speed Adjustment
After adjusting the idle mixture, reset the idle stop to the idle rpm specified in the aircraft maintenance manual. The engine must be warmed up thoroughly and checked for ignition system malfunctioning. Throughout any carburetor adjustment procedure, periodically run the engine up to approximately half of normal rated speed to clear the engine.Some carburetors are equipped with an eccentric screw to adjust idle rpm. Others use a spring-loaded screw to limit the throttle valve closing. In either case, adjust the screw as required to increase or decrease rpm with the throttle retarded against the stop. Open the throttle to clear the engine; close the throttle and allow the rpm to stabilize. Repeat this operation until the desired idling speed is obtained.
RELATED POSTS