Practically all hardness testing equipment now uses the resistance to penetration as a measure of hardness. Included among the better-known hardness testers are the Brinell and Rockwell, both of which are described and illustrated in this section. Also included is the Barcol tester, a popular portable-type hardness tester currently in use.
Brinell Tester
The Brinell hardness tester uses a hardened spherical ball that is forced into the surface of the metal. [Figure 1] This ball is 10 millimeters (0.3937 inch) in diameter. A pressure of 3,000 kilograms is used for ferrous metals and 500 kilograms for nonferrous metals. The pressure must be maintained at least 10 seconds for ferrous metals and at least 30 seconds for nonferrous metals. The load is applied by hydraulic pressure. A hand pump or an electric motor, depending on the model of tester, builds up the hydraulic pressure. A pressure gauge indicates the amount of pressure. There is a release mechanism for relieving the pressure after the test has been made, and a calibrated microscope is provided for measuring the diameter of the impression in millimeters. The machine has various shaped anvils for supporting the specimen and an elevating screw for bringing the specimen in contact with the ball penetrator. These are attachments for special tests. |
| Figure 1. Brinell hardness tester |
To determine the Brinell hardness number for a metal, measure the diameter of the impression using the calibrated microscope furnished with the tester. Then convert the measurement into the Brinell hardness number on the conversion table furnished with the tester.
Rockwell Tester
The Rockwell hardness tester measures the resistance to penetration, as does the Brinell tester. [Figure 2] Instead of measuring the diameter of the impression, the Rockwell tester measures the depth, and the hardness is indicated directly on a dial attached to the machine. The dial numbers in the outer circle are black and the inner numbers are red. Rockwell hardness numbers are based on the difference between the depth of penetration at major and minor loads. The greater this difference, the lower the hardness number and the softer the material. |
| Figure 2. Rockwell hardness tester |
Two types of penetrators are used with the Rockwell tester: a diamond cone and a hardened steel ball. The load, which forces the penetrator into the metal, is called the major load and is measured in kilograms. The results of each penetrator and load combination are reported on separate scales designated by letters. The penetrator, the major load, and the scale vary with the kind of metal being tested.
For hardened steels, the diamond penetrator is used; the major load is 150 kilograms; and the hardness is read on the “C” scale. When this reading is recorded, the letter “C” must precede the number indicated by the pointer. The C-scale setup is used for testing metals ranging in hardness from C-20 to the hardest steel (usually about C-70). If the metal is softer than C-20, the B-scale setup is used. With this setup, the 1⁄16-inch ball is used as a penetrator; the major load is 100 kilograms; and the hardness is read on the B-scale.
For hardened steels, the diamond penetrator is used; the major load is 150 kilograms; and the hardness is read on the “C” scale. When this reading is recorded, the letter “C” must precede the number indicated by the pointer. The C-scale setup is used for testing metals ranging in hardness from C-20 to the hardest steel (usually about C-70). If the metal is softer than C-20, the B-scale setup is used. With this setup, the 1⁄16-inch ball is used as a penetrator; the major load is 100 kilograms; and the hardness is read on the B-scale.
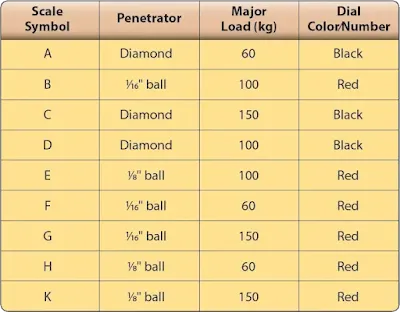
In addition to the C and B scales, there are other setups for special testing. The scales, penetrators, major loads, and dial numbers to be read are listed in Figure 3.
 |
| Figure 3. Standard Rockwell hardness scales |
The Rockwell tester is equipped with a weight pan, and two weights are supplied with the machine. One weight is marked in red. The other weight is marked in black. With no weight in the weight pan, the machine applies a major load of 60 kilograms. If the scale setup calls for a 100-kilogram load, the red weight is placed in the pan. For a 150-kilogram load, the black weight is added to the red weight. The black weight is always used with the red weight; it is never used alone.
Practically all testing is done with either the B-scale setup or the C-scale setup. For these scales, the colors may be used as a guide in selecting the weight (or weights) and in reading the dial. For the B-scale test, use the red weight and read the red numbers. For a C-scale test, add the black weight to the red weight and read the black numbers.
In setting up the Rockwell machine, use the diamond penetrator for testing materials known to be hard. If the hardness is unknown, try the diamond, since the steel ball may be deformed if used for testing hard materials. If the metal tests below C-22, then change to the steel ball.
Use the steel ball for all soft materials, those testing less than B-100. Should an overlap occur at the top of the B-scale and the bottom of the C-scale, use the C-scale setup.
Before the major load is applied, securely lock the test specimen in place to prevent slipping and to seat the anvil and penetrator properly. To do this, apply a load of 10 kilograms before the lever is tripped. This preliminary load is called the minor load. The minor load is 10 kilograms regardless of the scale setup.
The metal to be tested in the Rockwell tester must be ground smooth on two opposite sides and be free of scratches and foreign matter. The surface should be perpendicular to the axis of penetration, and the two opposite ground surfaces should be parallel. If the specimen is tapered, the amount of error depends on the taper. A curved surface also causes a slight error in the hardness test. The amount of error depends on the curvature (i.e., the smaller the radius of curvature, the greater the error). To eliminate such error, a small flat should be ground on the curved surface if possible.
Clad aluminum alloy sheets cannot be tested directly with any accuracy with a Rockwell hardness tester. If the hardness value of the base metal is desired, the pure aluminum coating must be removed from the area to be checked prior to testing.
Barcol Tester
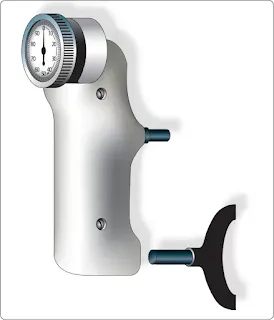
The Barcol tester is a portable unit designed for testing aluminum alloys, copper, brass, or other relatively soft materials. [Figure 4] It should not be used on aircraft steels. Approximate range of the tester is 25 to 100 Brinell. The unit can be used in any position and in any space that allows for the operator’s hand. It is of great value in the hardness testing of assembled or installed parts, especially to check for proper heat treatment. The hardness is indicated on a dial conveniently divided into 100 graduations. |
| Figure 4. Barcol portable hardness tester |
The design of the Barcol tester is such that operating experience is not necessary. It is only necessary to exert a light pressure against the instrument to drive the spring-loaded indenter into the material to be tested. The hardness reading is instantly indicated on the dial.
Several typical readings for aluminum alloys are listed in Figure 5. Note that the harder the material is, the higher the Barcol number. To prevent damage to the point, avoid sliding or scraping when it is in contact with the material being tested. If the point should become damaged, it must be replaced with a new one. Do not attempt to grind the point.
 |
| Figure 5. Typical Barcol readings for aluminum alloy |
Each tester is supplied with a test disk for checking the condition of the point. To check the point, press the instrument down on the test disk. When the downward pressure brings the end of the lower plunger guide against the surface of the disk, the indicator reading should be within the range shown on the test disk.
RELATED POSTS